WebGPU Transparency and Blending
It’s hard to cover transparency and blending because often, what you need to do for one situation is different than for another. So, this article will mostly be a tour of WebGPU features so we can refer back here when we cover specific techniques.
Canvas alphaMode
The first thing we need to be aware of, there is transparent and blending within WebGPU but there is also transparency and blending with a WebGPU canvas and the HTML page.
By default a WebGPU canvas is opaque. Its alpha channel is ignored. To make it not
ignored we have to set its alphaMode to 'premultiplied' when we call configure.
The default is 'opaque'
  context.configure({
    device,
    format: presentationFormat,
+    alphaMode: 'premultiplied',
  });
It’s important to understand what alphaMode: 'premultiplied' means. It means,
the colors you put in the canvas must have their color values already multiplied
by the alpha value.
Let’s make the smallest example we can. We’ll just create a render pass and set the clear color.
async function main() {
  const adapter = await navigator.gpu?.requestAdapter();
  const device = await adapter?.requestDevice();
  if (!device) {
    fail('need a browser that supports WebGPU');
    return;
  }

  // Get a WebGPU context from the canvas and configure it
  const canvas = document.querySelector('canvas');
  const context = canvas.getContext('webgpu');
  const presentationFormat = navigator.gpu.getPreferredCanvasFormat();
  context.configure({
    device,
    format: presentationFormat,
+    alphaMode: 'premultiplied',
  });

  const clearValue = [1, 0, 0, 0.01];
  const renderPassDescriptor = {
    label: 'our basic canvas renderPass',
    colorAttachments: [
      {
        // view: <- to be filled out when we render
        clearValue,
        loadOp: 'clear',
        storeOp: 'store',
      },
    ],
  };

  function render() {
    const encoder = device.createCommandEncoder({ label: 'clear encoder' });
    const canvasTexture = context.getCurrentTexture();
    renderPassDescriptor.colorAttachments[0].view =
        canvasTexture.createView();

    const pass = encoder.beginRenderPass(renderPassDescriptor);
    pass.end();

    const commandBuffer = encoder.finish();
    device.queue.submit([commandBuffer]);
  }

  const observer = new ResizeObserver(entries => {
    for (const entry of entries) {
      const canvas = entry.target;
      const width = entry.contentBoxSize[0].inlineSize;
      const height = entry.contentBoxSize[0].blockSize;
      canvas.width = Math.max(1, Math.min(width, device.limits.maxTextureDimension2D));
      canvas.height = Math.max(1, Math.min(height, device.limits.maxTextureDimension2D));
      render();
    }
  });
  observer.observe(canvas);
}
Let’s also set the canvas’s CSS background to a gray checkerboard
canvas {
  background-color: #404040;
  background-image:
     linear-gradient(45deg, #808080 25%, transparent 25%),
     linear-gradient(-45deg, #808080 25%, transparent 25%),
     linear-gradient(45deg, transparent 75%, #808080 75%),
     linear-gradient(-45deg, transparent 75%, #808080 75%);
  background-size: 32px 32px;
  background-position: 0 0, 0 16px, 16px -16px, -16px 0px;
}
To that let’s add a UI so we can set the alpha and color of the clear value as well as whether or not it’s premultiplied
+import GUI from '../3rdparty/muigui-0.x.module.js';

...

+  const color = [1, 0, 0];
+  const settings = {
+    premultiply: false,
+    color,
+    alpha: 0.01,
+  };
+
+  const gui = new GUI().onChange(render);
+  gui.add(settings, 'premultiply');
+  gui.add(settings, 'alpha', 0, 1);
+  gui.addColor(settings, 'color');

  function render() {
    const encoder = device.createCommandEncoder({ label: 'clear encoder' });
    const canvasTexture = context.getCurrentTexture();
    renderPassDescriptor.colorAttachments[0].view =
        canvasTexture.createView();

+    const { alpha } = settings;
+    clearValue[3] = alpha;
+    if (settings.premultiply) {
+      // premultiply the colors by the alpha
+      clearValue[0] = color[0] * alpha;
+      clearValue[1] = color[1] * alpha;
+      clearValue[2] = color[2] * alpha;
+    } else {
+      // use un-premultiplied colors
+      clearValue[0] = color[0];
+      clearValue[1] = color[1];
+      clearValue[2] = color[2];
+    }

    const pass = encoder.beginRenderPass(renderPassDescriptor);
    pass.end();

    const commandBuffer = encoder.finish();
    device.queue.submit([commandBuffer]);
  }
If we run that I hope you’ll see an issue
What colors appear here is UNDEFINED!!!
On my machine I got these colors
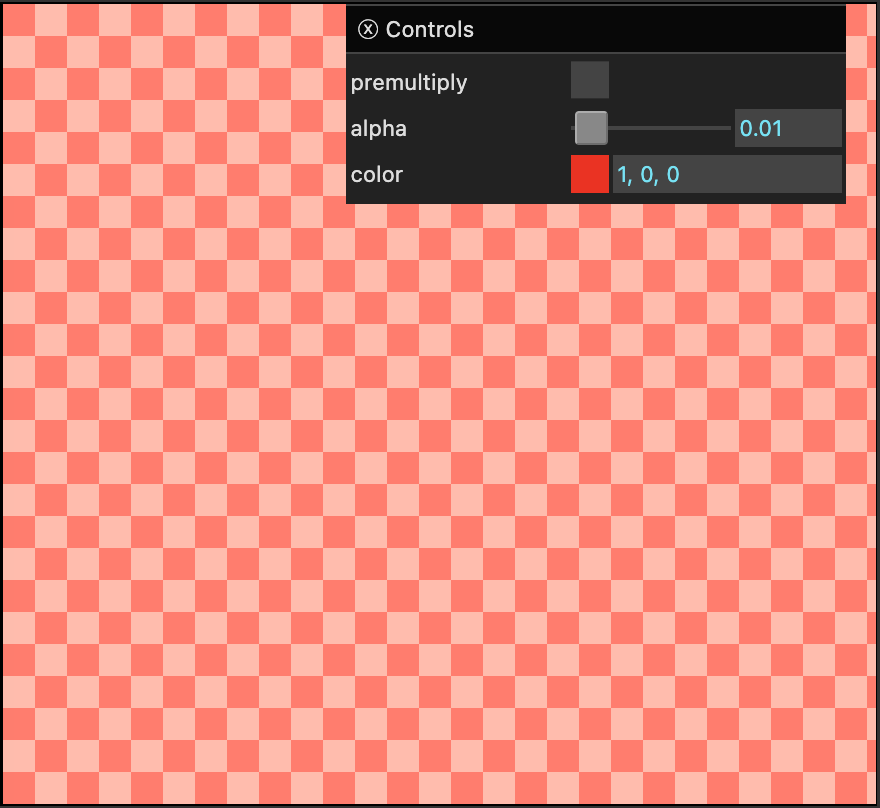
Do you see what’s wrong? We have the alpha set to 0.01. The background colors are supposed to be medium and dark gray. The color is set to red (1, 0, 0). Putting 0.01 amount of red on top of a medium/dark gray checkerboard should be nearly imperceptible so why is it 2 bright shades of pink?
The reason is, THIS IS AN ILLEGAL COLOR!. The color of
our canvas is 1, 0, 0, 0.01 but that is not a premultiplied
color. “premultiplied” means the colors we put in the canvas
must already be multiplied by the alpha value. Given an alpha
value of 0.01, no other value should be greater than 0.01.
If you click the ‘premultiplied’ checkbox then the code will
premultiply the color. The value put in the canvas will be
0.01, 0, 0, 0.01 and it will look correct, almost imperceptible.
With ‘premultiplied’ checked, adjust the alpha and you’ll see it fades to red as the alpha approaches 1.
Note: Because the example
1, 0, 0, 0.01is an illegal color, how it is displayed is undefined. It’s up to the browser what happens with illegal colors so don’t use illegal colors and expect the same results across devices.
Let’s say our color is 1, 0.5, 0.25 which is orange and we want it to be 33% transparent so our alpha is 0.33. Then, our “premultiplied color” would be
                      premultiplied
   ---------------------------------
   r = 1    * 0.33   = 0.33
   g = 0.5  * 0.33   = 0.165
   g = 0.25 * 0.33   = 0.0825
   a = 0.33          = 0.33
How you get a pre-multiplied color is up to you. If you have un-premultiplied colors then in the shader you could premultiply with code like this.
return vec4f(color.rgb * color.a, color.a)`;
The function, copyExternalImageToTexture which we covered in
the article on importing textures
takes a premultipliedAlpha: true option. (see below)
This means when you load the image into the texture by calling
copyExternalImageToTexture you can tell WebGPU to premultiply the colors for
you as it copies them to the texture. That way when you call textureSample the value
you get will already be premultiplied.
The point of this section was
-
To explain
alphaMode: 'premultiplied'WebGPU canvas configuration option.This lets a WebGPU canvas have transparency
-
To introduce the concept of premultiplied alpha colors
How you get premultiplied colors is up to you. In the example above we created a premultiplied
clearValuein JavaScript.We can also return colors from fragment shaders (and/or) other shaders. We might provide premultiplied colors to those shaders. We might do the multiplication in the shader itself. We might run a post processing pass to premultiply the colors. What’s important is that the colors in the canvas, one way or another, end up premultiplied if we’re using
alphaMode: 'premultiplied'A good reference for other premultiplied vs un-premultiplied colors is this article: GPUs prefer premultiplication.
Discard
discard is a WGSL statement that you can use in a fragment
shader to discard the current fragment or in other words, to
not draw a pixel.
Let’s take our example that draws a checkerboard in the fragment
shader using the @builtin(position) from the article on inter-stage variables.
Instead of drawing a 2 color checkerboard, we’ll discard for one of the two cases.
@fragment fn fs(fsInput: OurVertexShaderOutput) -> @location(0) vec4f {
-  let red = vec4f(1, 0, 0, 1);
  let cyan = vec4f(0, 1, 1, 1);

  let grid = vec2u(fsInput.position.xy) / 8;
  let checker = (grid.x + grid.y) % 2 == 1;

+        if (checker) {
+          discard;
+        }
+
+        return cyan;

-  return select(red, cyan, checker);
}
A few other changes, we’ll add in the CSS above to make the
canvas have a CSS checkerboard background. We’ll also set
alphaMode: 'premultiplied'. And we’ll set the clearValue
to [0, 0, 0, 0]
  context.configure({
    device,
    format: presentationFormat,
+    alphaMode: 'premultiplied',
  });

  ...

  const renderPassDescriptor = {
    label: 'our basic canvas renderPass',
    colorAttachments: [
      {
        // view: <- to be filled out when we render
-        clearValue: [0.3, 0.3, 0.3, 1],
+        clearValue: [0, 0, 0, 0],
        loadOp: 'clear',
        storeOp: 'store',
      },
    ],
  };
...
You should see that every other square is “transparent” in that it wasn’t even drawn.
It’s common in a shader used for transparency to discard based on the alpha value. Something like
@fragment fn fs(fsInput: OurVertexShaderOutput) -> @location(0) vec4f {
    let color = ... compute a color ....

    if (color.a < threshold) {
      discard;
    }

    return color;
}
Where threshold might be a value from a uniform or a constant
or whatever is appropriate.
This is probably most commonly used for sprites and for foliage like grass and leaves because, if we are drawing and we’re using a depth texture, like we introduced in the article on orthographic projection, then when we draw a sprite, leaf, or blade of grass, none of the sprites, leaves, or grass behind the thing we’re currently drawing will be drawn, even if the alpha value is 0 because we’ll still be updating the depth texture. So, instead of drawing we discard. We’ll go over this more in another article.
Blend Settings
Finally we get to blend settings. When you create a render pipeline, for each
target in the fragment shader, you can set blending state. In other words,
here’s a typical pipeline from our other examples so far
    const pipeline = device.createRenderPipeline({
      label: 'hardcoded textured quad pipeline',
      layout: pipelineLayout,
      vertex: {
        module,
      },
      fragment: {
        module,
        targets: [
          {
            format: presentationFormat,
          },
        ],
      },
    });
And here it is with blending added to target[0].
    const pipeline = device.createRenderPipeline({
      label: 'hardcoded textured quad pipeline',
      layout: pipelineLayout,
      vertex: {
        module,
      },
      fragment: {
        module,
        targets: [
          {
            format: presentationFormat,
+            blend: {
+              color: {
+                srcFactor: 'one',
+                dstFactor: 'one-minus-src-alpha'
+              },
+              alpha: {
+                srcFactor: 'one',
+                dstFactor: 'one-minus-src-alpha'
+              },
+            },
          },
        ],
      },
    });
The full list of default settings are:
blend: {
  color: {
    operation: 'add',
    srcFactor: 'one',
    dstFactor: 'zero',
  },
  alpha: {
    operation: 'add',
    srcFactor: 'one',
    dstFactor: 'zero',
  },
}
Where color is what happens to the rgb portion of a color and alpha is
what happens to the a (alpha) portion.
operation can be one of
- ‘add’
- ‘subtract’
- ‘reverse-subtract’
- ‘min’
- ‘max’
srcFactor and dstFactor can each be one of
- ‘zero’
- ‘one’
- ‘src’
- ‘one-minus-src’
- ‘src-alpha’
- ‘one-minus-src-alpha’
- ‘dst’
- ‘one-minus-dst’
- ‘dst-alpha’
- ‘one-minus-dst-alpha’
- ‘src-alpha-saturated’
- ‘constant’
- ‘one-minus-constant’
Most of them are relatively straight forward to understand. Think of it as
result = operation((src * srcFactor), (dst * dstFactor))
Where src is the value returned by your fragment shader and dst is the value
already in the texture you are drawing to.
Consider the default where operation is 'add', srcFactor is 'one' and
dstFactor is 'zero'. This gives us
   result = add((src * 1), (dst * 0))
   result = add(src * 1, dst * 0)
   result = add(src, 0)
   result = src;
As you can see, the default result ends up being just src.
Of the blend factors above, 2 mention a constant, 'constant' and
'one-minus-constant'. The constant referred to here is set in a render pass
with the setBlendConstant command and defaults to [0, 0, 0, 0]. This lets
you change it between draws.
Probably the most common setting for blending is
{
  operation: 'add',
  srcFactor: 'one',
  dstFactor: 'one-minus-src-alpha'
}
This mode is used most often with “premultiplied alpha” meaning it expects that the “src” has already had its RGB colors “premultiplied” by the alpha value as we covered above.
Let’s make an example that shows these options.
First let’s make some JavaScript that creates two canvas 2D images with some alpha. We’ll load these 2 canvases into WebGPU textures.
First, some code for making an image we’ll use for our dst texture.
const hsl = (h, s, l) => `hsl(${h * 360 | 0}, ${s * 100}%, ${l * 100 | 0}%)`;

function createDestinationImage(size) {
  const canvas = document.createElement('canvas');
  canvas.width = size;
  canvas.height = size;
  const ctx = canvas.getContext('2d');

  const gradient = ctx.createLinearGradient(0, 0, size, size);
  for (let i = 0; i <= 6; ++i) {
    gradient.addColorStop(i / 6, hsl(i / -6, 1, 0.5));
  }

  ctx.fillStyle = gradient;
  ctx.fillRect(0, 0, size, size);

  ctx.fillStyle = 'rgba(0, 0, 0, 255)';
  ctx.globalCompositeOperation = 'destination-out';
  ctx.rotate(Math.PI / -4);
  for (let i = 0; i < size * 2; i += 32) {
    ctx.fillRect(-size, i, size * 2, 16);
  }

  return canvas;
}
And here it is running.
Here’s some code for making an image we’ll use for our src texture.
const hsla = (h, s, l, a) => `hsla(${h * 360 | 0}, ${s * 100}%, ${l * 100 | 0}%, ${a})`;

function createSourceImage(size) {
  const canvas = document.createElement('canvas');
  canvas.width = size;
  canvas.height = size;
  const ctx = canvas.getContext('2d');
  ctx.translate(size / 2, size / 2);

  ctx.globalCompositeOperation = 'screen';
  const numCircles = 3;
  for (let i = 0; i < numCircles; ++i) {
    ctx.rotate(Math.PI * 2 / numCircles);
    ctx.save();
    ctx.translate(size / 6, 0);
    ctx.beginPath();

    const radius = size / 3;
    ctx.arc(0, 0, radius, 0, Math.PI * 2);

    const gradient = ctx.createRadialGradient(0, 0, radius / 2, 0, 0, radius);
    const h = i / numCircles;
    gradient.addColorStop(0.5, hsla(h, 1, 0.5, 1));
    gradient.addColorStop(1, hsla(h, 1, 0.5, 0));

    ctx.fillStyle = gradient;
    ctx.fill();
    ctx.restore();
  }
  return canvas;
}
And here’s that running.
Now that we have both, we can modify the canvas importing example from the article on importing textures.
First, let’s make the 2 canvas images
const size = 300;
const srcCanvas = createSourceImage(size);
const dstCanvas = createDestinationImage(size);
Let’s modify the shader so it doesn’t multiply the texture coords by 50 since we will not be trying to draw a long plane into the distance.
@vertex fn vs(
  @builtin(vertex_index) vertexIndex : u32
) -> OurVertexShaderOutput {
  let pos = array(
    // 1st triangle
    vec2f( 0.0,  0.0),  // center
    vec2f( 1.0,  0.0),  // right, center
    vec2f( 0.0,  1.0),  // center, top

    // 2nd triangle
    vec2f( 0.0,  1.0),  // center, top
    vec2f( 1.0,  0.0),  // right, center
    vec2f( 1.0,  1.0),  // right, top
  );

  var vsOutput: OurVertexShaderOutput;
  let xy = pos[vertexIndex];
  vsOutput.position = uni.matrix * vec4f(xy, 0.0, 1.0);
-  vsOutput.texcoord = xy * vec2f(1, 50);
+  vsOutput.texcoord = xy;
  return vsOutput;
}
Let’s update the createTextureFromSource function so we can pass premultipliedAlpha: true/false to
it and it will pass it on to copyExternalTextureToImage.
-  function copySourceToTexture(device, texture, source, {flipY} = {}) {
+  function copySourceToTexture(device, texture, source, {flipY, premultipliedAlpha} = {}) {
    device.queue.copyExternalImageToTexture(
      { source, flipY, },
-      { texture },
+      { texture, premultipliedAlpha },
      { width: source.width, height: source.height },
    );

    if (texture.mipLevelCount > 1) {
      generateMips(device, texture);
    }
  }
Then, let’s use that to create two versions of each texture, one premultiplied, one “un-premultiplied” or “not premultiplied”
  const srcTextureUnpremultipliedAlpha =
      createTextureFromSource(
          device, srcCanvas,
          {mips: true});
  const dstTextureUnpremultipliedAlpha =
      createTextureFromSource(
          device, dstCanvas,
          {mips: true});

  const srcTexturePremultipliedAlpha =
      createTextureFromSource(
          device, srcCanvas,
          {mips: true, premultipliedAlpha: true});
  const dstTexturePremultipliedAlpha =
      createTextureFromSource(
          device, dstCanvas,
          {mips: true, premultipliedAlpha: true});
Note: We could add an option to premultiply in the shader but that’s arguably not common. Rather it’s more common to decide, based on your needs, whether all textures containing color are premultiplied or not premultiplied. So, we’ll stick with different textures and add UI options to select the premultiplied ones or un-premultiplied ones.
We need a uniform buffer for each of our 2 draws just in case we want to draw in 2 different places or the textures are 2 different sizes.
  function makeUniformBufferAndValues(device) {
    // offsets to the various uniform values in float32 indices
    const kMatrixOffset = 0;

    // create a buffer for the uniform values
    const uniformBufferSize =
      16 * 4; // matrix is 16 32bit floats (4bytes each)
    const buffer = device.createBuffer({
      label: 'uniforms for quad',
      size: uniformBufferSize,
      usage: GPUBufferUsage.UNIFORM | GPUBufferUsage.COPY_DST,
    });

    // create a typedarray to hold the values for the uniforms in JavaScript
    const values = new Float32Array(uniformBufferSize / 4);
    const matrix = values.subarray(kMatrixOffset, 16);
    return { buffer, values, matrix };
  }
  const srcUniform = makeUniformBufferAndValues(device);
  const dstUniform = makeUniformBufferAndValues(device);
We need a sampler and we need a bindGroup for each texture. This brings up an issue.
A bindGroup needs a bindGroup layout. Most of the examples on this site
get their layout from a pipeline by calling somePipeline.getBindGroupLayout(groupNumber).
In our case though, we’re going to create a pipeline based on the blend state settings
we choose. So, we won’t have the pipeline to get a bindGroupLayout from until render
time.
We could create the bindGroups at render time. OR, we could create our own bindGroupLayout and tell the pipelines to use it. This way we can create the bindGroups at init time and they’ll be compatible with any pipeline that uses the same bindGroupLayout.
The details of creating a bindGroupLayout and pipelineLayout are covered in another article. For now, here’s the code to create them that matches our shader module
  const bindGroupLayout = device.createBindGroupLayout({
    entries: [
      { binding: 0, visibility: GPUShaderStage.FRAGMENT, sampler: { }, },
      { binding: 1, visibility: GPUShaderStage.FRAGMENT, texture: { } },
      { binding: 2, visibility: GPUShaderStage.VERTEX, buffer: { } },
    ],
  });

  const pipelineLayout = device.createPipelineLayout({
    bindGroupLayouts: [
      bindGroupLayout,
    ],
  });
With the bindGroupLayout created, we can use it to make bindGroups.
  const sampler = device.createSampler({
    magFilter: 'linear',
    minFilter: 'linear',
    mipmapFilter: 'linear',
  });


  const srcBindGroupUnpremultipliedAlpha = device.createBindGroup({
    layout: bindGroupLayout,
    entries: [
      { binding: 0, resource: sampler },
      { binding: 1, resource: srcTextureUnpremultipliedAlpha },
      { binding: 2, resource: { buffer: srcUniform.buffer }},
    ],
  });

  const dstBindGroupUnpremultipliedAlpha = device.createBindGroup({
    layout: bindGroupLayout,
    entries: [
      { binding: 0, resource: sampler },
      { binding: 1, resource: dstTextureUnpremultipliedAlpha },
      { binding: 2, resource: { buffer: dstUniform.buffer }},
    ],
  });

  const srcBindGroupPremultipliedAlpha = device.createBindGroup({
    layout: bindGroupLayout,
    entries: [
      { binding: 0, resource: sampler },
      { binding: 1, resource: srcTexturePremultipliedAlpha },
      { binding: 2, resource: { buffer: srcUniform.buffer }},
    ],
  });

  const dstBindGroupPremultipliedAlpha = device.createBindGroup({
    layout: bindGroupLayout,
    entries: [
      { binding: 0, resource: sampler },
      { binding: 1, resource: dstTexturePremultipliedAlpha },
      { binding: 2, resource: { buffer: dstUniform.buffer }},
    ],
  });
Now that we have bindGroups and textures let’s make an array of the premultiplied textures vs the un-premultiplied textures so we can easily select one set or the other
  const textureSets = [
    {
      srcTexture: srcTexturePremultipliedAlpha,
      dstTexture: dstTexturePremultipliedAlpha,
      srcBindGroup: srcBindGroupPremultipliedAlpha,
      dstBindGroup: dstBindGroupPremultipliedAlpha,
    },
    {
      srcTexture: srcTextureUnpremultipliedAlpha,
      dstTexture: dstTextureUnpremultipliedAlpha,
      srcBindGroup: srcBindGroupUnpremultipliedAlpha,
      dstBindGroup: dstBindGroupUnpremultipliedAlpha,
    },
  ];
In our render pass descriptor we’ll pull out the clearValue so we can more
easily access it
+  const clearValue = [0, 0, 0, 0];
  const renderPassDescriptor = {
    label: 'our basic canvas renderPass',
    colorAttachments: [
      {
        // view: <- to be filled out when we render
-        clearValue: [0.3, 0.3, 0.3, 1];
+        clearValue,
        loadOp: 'clear',
        storeOp: 'store',
      },
    ],
  };
We’ll need 2 render pipelines. One to draw the dest texture, this one will
not use blending. Notice we’re passing in the pipelineLayout instead of using
auto as we’ve done in most examples so far.
  const dstPipeline = device.createRenderPipeline({
    label: 'hardcoded textured quad pipeline',
    layout: pipelineLayout,
    vertex: {
      module,
    },
    fragment: {
      module,
      targets: [ { format: presentationFormat } ],
    },
  });
The other pipeline will be created at render time with whatever blend options we choose
  const color = {
    operation: 'add',
    srcFactor: 'one',
    dstFactor: 'one-minus-src',
  };

  const alpha = {
    operation: 'add',
    srcFactor: 'one',
    dstFactor: 'one-minus-src',
  };

  function render() {
    ...

    const srcPipeline = device.createRenderPipeline({
      label: 'hardcoded textured quad pipeline',
      layout: pipelineLayout,
      vertex: {
        module,
      },
      fragment: {
        module,
        targets: [
          {
            format: presentationFormat,
            blend: {
              color,
              alpha,
            },
          },
        ],
      },
    });
To render we choose a texture set and then render the dst texture with the dstPipeline (no blending), and then on top of that we render the src texture with the srcPipeline (with blending)
+  const settings = {
+    textureSet: 0,
+  };

  function render() {
    const srcPipeline = device.createRenderPipeline({
      label: 'hardcoded textured quad pipeline',
      layout: pipelineLayout,
      vertex: {
        module,
      },
      fragment: {
        module,
        targets: [
          {
            format: presentationFormat,
            blend: {
              color,
              alpha,
            },
          },
        ],
      },
    });

+    const {
+      srcTexture,
+      dstTexture,
+      srcBindGroup,
+      dstBindGroup,
+    } = textureSets[settings.textureSet];

    const canvasTexture = context.getCurrentTexture();
    // Get the current texture from the canvas context and
    // set it as the texture to render to.
    renderPassDescriptor.colorAttachments[0].view =
        canvasTexture.createView();

+    function updateUniforms(uniform, canvasTexture, texture) {
+      const projectionMatrix = mat4.ortho(0, canvasTexture.width, canvasTexture.height, 0, -1, 1);
+
+      mat4.scale(projectionMatrix, [texture.width, texture.height, 1], uniform.matrix);
+
+      // copy the values from JavaScript to the GPU
+      device.queue.writeBuffer(uniform.buffer, 0, uniform.values);
+    }
+    updateUniforms(srcUniform, canvasTexture, srcTexture);
+    updateUniforms(dstUniform, canvasTexture, dstTexture);

    const encoder = device.createCommandEncoder({ label: 'render with blending' });
    const pass = encoder.beginRenderPass(renderPassDescriptor);

+    // draw dst
+    pass.setPipeline(dstPipeline);
+    pass.setBindGroup(0, dstBindGroup);
+    pass.draw(6);  // call our vertex shader 6 times
+
+    // draw src
+    pass.setPipeline(srcPipeline);
+    pass.setBindGroup(0, srcBindGroup);
+    pass.draw(6);  // call our vertex shader 6 times

    pass.end();

    const commandBuffer = encoder.finish();
    device.queue.submit([commandBuffer]);
  }
Now let’s make some UI to set these values
+  const operations = [
+    'add',
+    'subtract',
+    'reverse-subtract',
+    'min',
+    'max',
+  ];
+
+  const factors = [
+    'zero',
+    'one',
+    'src',
+    'one-minus-src',
+    'src-alpha',
+    'one-minus-src-alpha',
+    'dst',
+    'one-minus-dst',
+    'dst-alpha',
+    'one-minus-dst-alpha',
+    'src-alpha-saturated',
+    'constant',
+    'one-minus-constant',
+  ];

  const color = {
    operation: 'add',
    srcFactor: 'one',
    dstFactor: 'one-minus-src',
  };

  const alpha = {
    operation: 'add',
    srcFactor: 'one',
    dstFactor: 'one-minus-src',
  };

  const settings = {
    textureSet: 0,
  };

+  const gui = new GUI().onChange(render);
+  gui.add(settings, 'textureSet', ['premultiplied alpha', 'un-premultiplied alpha']);
+  const colorFolder = gui.addFolder('color');
+  colorFolder.add(color, 'operation', operations);
+  colorFolder.add(color, 'srcFactor', factors);
+  colorFolder.add(color, 'dstFactor', factors);
+  const alphaFolder = gui.addFolder('alpha');
+  alphaFolder.add(alpha, 'operation', operations);
+  alphaFolder.add(alpha, 'srcFactor', factors);
+  alphaFolder.add(alpha, 'dstFactor', factors);
If the operation is 'min' or 'max' we must set srcFactor and dstFactor to
'one' or else we’ll get an error
+  function makeBlendComponentValid(blend) {
+    const { operation } = blend;
+    if (operation === 'min' || operation === 'max') {
+      blend.srcFactor = 'one';
+      blend.dstFactor = 'one';
+    }
+  }

  function render() {
+    makeBlendComponentValid(color);
+    makeBlendComponentValid(alpha);
+    gui.updateDisplay();

    ...
Let’s also make it possible to set the blend constant for when we pick
'constant' or 'one-minus-constant' as a factor.
+  const constant = {
+    color: [1, 0.5, 0.25],
+    alpha: 1,
+  };

  const settings = {
    textureSet: 0,
  };

  const gui = new GUI().onChange(render);
  gui.add(settings, 'textureSet', ['premultiplied alpha', 'un-premultiplied alpha']);
  ...
+  const constantFolder = gui.addFolder('constant');
+  constantFolder.addColor(constant, 'color');
+  constantFolder.add(constant, 'alpha', 0, 1);

  ...

  function render() {
    ...

    const pass = encoder.beginRenderPass(renderPassDescriptor);

    // draw dst
    pass.setPipeline(dstPipeline);
    pass.setBindGroup(0, dstBindGroup);
    pass.draw(6);  // call our vertex shader 6 times

    // draw src
    pass.setPipeline(srcPipeline);
    pass.setBindGroup(0, srcBindGroup);
+    pass.setBlendConstant([...constant.color, constant.alpha]);
    pass.draw(6);  // call our vertex shader 6 times

    pass.end();
  }
As there are 13 * 13 * 5 * 13 * 13 * 5 possible settings there are
just too many to explore so let’s provide a list of presets. If
there is no alpha setting we’ll just repeat the color setting.
+  const presets = {
+    'default (copy)': {
+      color: {
+        operation: 'add',
+        srcFactor: 'one',
+        dstFactor: 'zero',
+      },
+    },
+    'premultiplied blend (source-over)': {
+      color: {
+        operation: 'add',
+        srcFactor: 'one',
+        dstFactor: 'one-minus-src-alpha',
+      },
+    },
+    'un-premultiplied blend': {
+      color: {
+        operation: 'add',
+        srcFactor: 'src-alpha',
+        dstFactor: 'one-minus-src-alpha',
+      },
+    },
+    'destination-over': {
+      color: {
+        operation: 'add',
+        srcFactor: 'one-minus-dst-alpha',
+        dstFactor: 'one',
+      },
+    },
+    'source-in': {
+      color: {
+        operation: 'add',
+        srcFactor: 'dst-alpha',
+        dstFactor: 'zero',
+      },
+    },
+    'destination-in': {
+      color: {
+        operation: 'add',
+        srcFactor: 'zero',
+        dstFactor: 'src-alpha',
+      },
+    },
+    'source-out': {
+      color: {
+        operation: 'add',
+        srcFactor: 'one-minus-dst-alpha',
+        dstFactor: 'zero',
+      },
+    },
+    'destination-out': {
+      color: {
+        operation: 'add',
+        srcFactor: 'zero',
+        dstFactor: 'one-minus-src-alpha',
+      },
+    },
+    'source-atop': {
+      color: {
+        operation: 'add',
+        srcFactor: 'dst-alpha',
+        dstFactor: 'one-minus-src-alpha',
+      },
+    },
+    'destination-atop': {
+      color: {
+        operation: 'add',
+        srcFactor: 'one-minus-dst-alpha',
+        dstFactor: 'src-alpha',
+      },
+    },
+    'additive (lighten)': {
+      color: {
+        operation: 'add',
+        srcFactor: 'one',
+        dstFactor: 'one',
+      },
+    },
+  };

  ...

  const settings = {
    textureSet: 0,
+    preset: 'default (copy)',
  };

  const gui = new GUI().onChange(render);
  gui.add(settings, 'textureSet', ['premultiplied alpha', 'un-premultiplied alpha']);
+  gui.add(settings, 'preset', Object.keys(presets))
+    .name('blending preset')
+    .onChange(presetName => {
+      const preset = presets[presetName];
+      Object.assign(color, preset.color);
+      Object.assign(alpha, preset.alpha || preset.color);
+      gui.updateDisplay();
+    });

  ...
Let’s also let you choose the canvas configuration for alphaMode.
  const settings = {
+    alphaMode: 'premultiplied',
    textureSet: 0,
    preset: 'default (copy)',
  };

  const gui = new GUI().onChange(render);
+  gui.add(settings, 'alphaMode', ['opaque', 'premultiplied']).name('canvas alphaMode');
  gui.add(settings, 'textureSet', ['premultiplied alpha', 'un-premultiplied alpha']);

  ...

  function render() {
    ...

+    context.configure({
+      device,
+      format: presentationFormat,
+      alphaMode: settings.alphaMode,
+    });

    const canvasTexture = context.getCurrentTexture();
    // Get the current texture from the canvas context and
    // set it as the texture to render to.
    renderPassDescriptor.colorAttachments[0].view =
        canvasTexture.createView();
And finally, lets let you pick the clearValue for the render pass.
+  const clear = {
+    color: [0, 0, 0],
+    alpha: 0,
+    premultiply: true,
+  };

  const settings = {
    alphaMode: 'premultiplied',
    textureSet: 0,
    preset: 'default (copy)',
  };

  const gui = new GUI().onChange(render);

  ...

+  const clearFolder = gui.addFolder('clear color');
+  clearFolder.add(clear, 'premultiply');
+  clearFolder.add(clear, 'alpha', 0, 1);
+  clearFolder.addColor(clear, 'color');

  function render() {
    ...

    const canvasTexture = context.getCurrentTexture();
    // Get the current texture from the canvas context and
    // set it as the texture to render to.
    renderPassDescriptor.colorAttachments[0].view =
        canvasTexture.createView();

+    {
+      const { alpha, color, premultiply } = clear;
+      const mult = premultiply ? alpha : 1;
+      clearValue[0] = color[0] * mult;
+      clearValue[1] = color[1] * mult;
+      clearValue[2] = color[2] * mult;
+      clearValue[3] = alpha;
+    }
That was a lot of options. Maybe too many 😅. In any case, we now have an example where we can play around with the blend settings
Given our source images
Here’s some known useful blend settings
These blend setting names are from the Canvas 2D
globalCompositeOperation
options. There are more options listed in that spec but most of the rest require
more math than can be done with only these base blending settings and so require
different solutions.
Now that we have these fundamentals of blending in WebGPU we can refer to them as we cover various techniques.