WebGPU Compatibility Mode
WebGPU Compatibility mode is a version of WebGPU that, with some limits, can run on older devices. The idea is, if you can make your app run within some extra limits and restrictions then you can request a webgpu compatibility adapter and have your app run in more places.
Note: Compatibility mode is shipping in Chrome 146. (2026-02-23) It may be available in your browser as an experiment. In, Chrome Canary, as of version 136.0.7063.0 (2025-03-11), you can allow compatibility mode by enabling the flag “enable-unsafe-webgpu” by going to
chrome://flags/#enable-unsafe-webgpu.
To give some idea what what you can do in compatibility mode, effectively nearly all WebGL2 programs could be converted to run on compatibility mode.
Here’s how you do it.
const adapter = await navigator.gpu.requestAdapter({
  featureLevel: 'compatibility',
});
const device = await adapter.requestDevice();
Simple! Note that every app that follows all the limits of compatibility mode is a valid “core” webgpu app and will run anywhere WebGPU is already running.
Major limits and restrictions
Possibly 0 storage buffers in vertex shaders.
The major restriction that is most likely to affect WebGPU apps is that ~45% of these old devices do not support storage buffers in vertex shaders.
We used this feature in the article on storage buffers which is the 3nd article on this site. After that article we switched to using vertex buffers. Using vertex buffers is common and works everywhere but certain solutions are easier with storage buffers. One example is this example of drawing wireframes. It uses storage buffers to generate triangles from vertex data.
With vertex data stored in storage buffers we can randomly access the vertex data. With the vertex data in vertex buffer we can not. Of course there are always other solutions.
Medium limits and restrictions
Only a single view dimension is allowed for a texture as a TEXTURE_BINDING
In normal WebGPU you can make a 2d texture like this
const myTexture = device.createTexture({
  size: [width, height, 6],
  usage: ...
  format: ...
});
You can then view it 3 different view dimensions
// a view of myTexture as a 2d array with 6 layers
const as2DArray = myTexture.createView();

// view layer 3 of myTexture as a 2d texture
const as2D = myTexture.createView({
  dimension: '2d',
  baseArrayLayer: 3,
  arrayLayerCount: 1,
});

// view of myTexture as a cubemap
const asCube = myTexture.createView({
  dimension: 'cube',
});
In compatibility mode you can only use one view dimension and you have to
choose which view dimension when you create the texture. A 2D texture with
1 layer defaults to only being usable as a '2d' view. A 2D texture with
more than 1 layer defaults to only being usable as a '2d-array’ view.
If you want something other than the default you must tell WebGPU. For example,
If you want a cube map then you must tell WebGPU when you create the texture.
const cubeTexture = device.createTexture({
  size: [width, height, 6],
  usage: ...
  format: ...
  textureBindingViewDimension: 'cube',
});
Note, this extra parameter is called textureBindingViewDimension because
it relates to using the texture with usage TEXTURE_BINDING. You can still
use a single layer of a cubemap or 2d-array as a 2d texture as a RENDER_ATTACHMENT.
To put it another way, you must use this same view dimension when using the
texture in a bind group. You can still use the 2d dimension, even if the
textureBindingViewDimension is 2d-array or cube when using the texture
in as a render target.
In compatibility mode, using the texture in a bind group with another type of view will generate a validation error.
// a view of cubeTexture as a 2d array with 6 layers
const bindGroup = device.createBindGroup({
  ...
  entries: [
    {
      binding,
      // ERROR in compatibility mode: texture is a cubemap not a 2d-array
      // (the default for a texture with more than 1 layer)
      resource: cubeTexture,
    },
  ],
})
// view layer 3 of cubeTexture as a 2d texture
const bindGroup = device.createBindGroup({
  ...
  entries: [
    {
      binding,
      // ERROR in compatibility mode: texture is a cubemap not 2d
      resource: cubeTexture.createView({
        viewDimension: '2d',
        baseArrayLayer: 3,
        arrayLayerCount: 1,
      }),
    },
  ]
});
// view of cubeTexture as a cubemap
const bindGroup = device.createBindGroup({
  ...
  entries: [
    {
      binding,
      // GOOD!
      resource: cubeTexture.createView({
        viewDimension: 'cube',
      }),
    },
  ],
});
This restriction is not that big of a deal. Few programs want to use a texture with different kinds of views.
When calling texture.createView you can not select a subset of layers in a bindGroup
In core WebGPU we can create a texture with some layers
const texture = device.createTexture({
  size: [64, 128, 8],   // 8 layers,
  ...
});
We can then select a subset of layers
const bindGroup = device.createBindGroup({
  ...
  entries: [
    {
      binding,
      // ERROR  in compatibility mode - select layers 3 and 4
      resource: cubeTexture.createView({
        baseArrayLayer: 3,
        arrayLayerCount: 2,
      }),
    },
  ],
});
This restriction is also not that big of a deal. Few programs want to select a subset of layers from a texture.
Generating Mipmaps in compatibility mode.
There is one place though both of these restrictions comes up and that is when generating mipmaps, which is a common use-case.
Recall that we made a gpu based mipmap generator in
the article in importing images into textures.
We modified that function to generate mipmaps for 2d-array and cubemaps in
the article on cube maps. In that version
we always view each layer of the texture with a '2d' dimension to reference
just one layer of the texture.
This won’t work in compatibility mode for the reasons above. We can’t use a '2d'
view of '2d-array' or 'cube' texture. We also can not select individual layers
in a bind group to select which layer to read from.
To make the code work in compatibility mode we have to work with textures
with the same view dimension they were created with and we need to pass in the texture
with access to all layers and select the layer we want in the shader itself, rather
than selecting the layer via createView as we were doing.
So let’s do that! We’ll start with the code for generateMips from the article on cubemaps.
  const generateMips = (() => {
    let sampler;
    let module;
    const pipelineByFormat = {};

    return function generateMips(device, texture) {
      if (!module) {
        module = device.createShaderModule({
          label: 'textured quad shaders for mip level generation',
          code: /* wgsl */ `
            struct VSOutput {
              @builtin(position) position: vec4f,
              @location(0) texcoord: vec2f,
            };

            @vertex fn vs(
              @builtin(vertex_index) vertexIndex : u32
            ) -> VSOutput {
              let pos = array(

                vec2f( 0.0,  0.0),  // center
                vec2f( 1.0,  0.0),  // right, center
                vec2f( 0.0,  1.0),  // center, top

                // 2st triangle
                vec2f( 0.0,  1.0),  // center, top
                vec2f( 1.0,  0.0),  // right, center
                vec2f( 1.0,  1.0),  // right, top
              );

              var vsOutput: VSOutput;
              let xy = pos[vertexIndex];
              vsOutput.position = vec4f(xy * 2.0 - 1.0, 0.0, 1.0);
              vsOutput.texcoord = vec2f(xy.x, 1.0 - xy.y);
              return vsOutput;
            }

            @group(0) @binding(0) var ourSampler: sampler;
            @group(0) @binding(1) var ourTexture: texture_2d<f32>;

            @fragment fn fs(fsInput: VSOutput) -> @location(0) vec4f {
              return textureSample(ourTexture, ourSampler, fsInput.texcoord);
            }
          `,
        });

        sampler = device.createSampler({
          minFilter: 'linear',
          magFilter: 'linear',
        });
      }

      if (!pipelineByFormat[texture.format]) {
        pipelineByFormat[texture.format] = device.createRenderPipeline({
          label: 'mip level generator pipeline',
          layout: 'auto',
          vertex: {
            module,
          },
          fragment: {
            module,
            targets: [{ format: texture.format }],
          },
        });
      }
      const pipeline = pipelineByFormat[texture.format];

      const encoder = device.createCommandEncoder({
        label: 'mip gen encoder',
      });

      for (let baseMipLevel = 1; baseMipLevel < texture.mipLevelCount; ++baseMipLevel) {
        for (let layer = 0; layer < texture.depthOrArrayLayers; ++layer) {
          const bindGroup = device.createBindGroup({
            layout: pipeline.getBindGroupLayout(0),
            entries: [
              { binding: 0, resource: sampler },
              {
                binding: 1,
                resource: texture.createView({
                  dimension: '2d',
                  baseMipLevel: baseMipLevel - 1,
                  mipLevelCount: 1,
                  baseArrayLayer: layer,
                  arrayLayerCount: 1,
                }),
              },
            ],
          });

          const renderPassDescriptor = {
            label: 'our basic canvas renderPass',
            colorAttachments: [
              {
                view: texture.createView({
                  dimension: '2d',
                  baseMipLevel: baseMipLevel,
                  mipLevelCount: 1,
                  baseArrayLayer: layer,
                  arrayLayerCount: 1,
                }),
                loadOp: 'clear',
                storeOp: 'store',
              },
            ],
          };

          const pass = encoder.beginRenderPass(renderPassDescriptor);
          pass.setPipeline(pipeline);
          pass.setBindGroup(0, bindGroup);
          pass.draw(6);  // call our vertex shader 6 times
          pass.end();
        }
      }

      const commandBuffer = encoder.finish();
      device.queue.submit([commandBuffer]);
    };
  })();
We need to change the WGSL so for each type of texture (2d, 2d-array, cube, etc…) we use a different fragment shader and we need to be able to pass in a layer to read from.
+const faceMat = array(
+  mat3x3f( 0,  0,  -2,  0, -2,   0,  1,  1,   1),   // pos-x
+  mat3x3f( 0,  0,   2,  0, -2,   0, -1,  1,  -1),   // neg-x
+  mat3x3f( 2,  0,   0,  0,  0,   2, -1,  1,  -1),   // pos-y
+  mat3x3f( 2,  0,   0,  0,  0,  -2, -1, -1,   1),   // neg-y
+  mat3x3f( 2,  0,   0,  0, -2,   0, -1,  1,   1),   // pos-z
+  mat3x3f(-2,  0,   0,  0, -2,   0,  1,  1,  -1));  // neg-z

struct VSOutput {
  @builtin(position) position: vec4f,
  @location(0) texcoord: vec2f,
+  @location(1) @interpolate(flat, either) baseArrayLayer: u32,
};

@vertex fn vs(
  @builtin(vertex_index) vertexIndex : u32,
+  @builtin(instance_index) baseArrayLayer: u32,
) -> VSOutput {
  var pos = array<vec2f, 3>(
    vec2f(-1.0, -1.0),
    vec2f(-1.0,  3.0),
    vec2f( 3.0, -1.0),
  );

  var vsOutput: VSOutput;
  let xy = pos[vertexIndex];
  vsOutput.position = vec4f(xy, 0.0, 1.0);
  vsOutput.texcoord = xy * vec2f(0.5, -0.5) + vec2f(0.5);
+  vsOutput.baseArrayLayer = baseArrayLayer;
  return vsOutput;
}

@group(0) @binding(0) var ourSampler: sampler;
-@group(0) @binding(1) var ourTexture: texture_2d<f32>;

+@group(0) @binding(1) var ourTexture2d: texture_2d<f32>;
@fragment fn fs2d(fsInput: VSOutput) -> @location(0) vec4f {
-  return textureSample(ourTexture, ourSampler, fsInput.texcoord);
+  return textureSample(ourTexture2d, ourSampler, fsInput.texcoord);
}

+@group(0) @binding(1) var ourTexture2dArray: texture_2d_array<f32>;
+@fragment fn fs2darray(fsInput: VSOutput) -> @location(0) vec4f {
+  return textureSample(
+    ourTexture2dArray,
+    ourSampler,
+    fsInput.texcoord,
+    fsInput.baseArrayLayer);
+}
+
+@group(0) @binding(1) var ourTextureCube: texture_cube<f32>;
+@fragment fn fscube(fsInput: VSOutput) -> @location(0) vec4f {
+  return textureSample(
+    ourTextureCube,
+    ourSampler,
+    faceMat[fsInput.baseArrayLayer] * vec3f(fract(fsInput.texcoord), 1));
+}
This code has 3 fragment shaders, one for each of '2d', '2d-array', 'cube'.
It uses the large triangle to cover clip space technique
covered elsewhere to draw.
It also uses @builtin(instance_index) to select the layer. This is an interesting and quick way
to pass in a single integer value to a shader without having to use a uniform buffer.
When we call draw, the 4th parameter is the first instance which will be passed
to the shader as @builtin(instance_index). We pass that from the vertex shader to fragment
shader via VSOutput.baseArrayLayer which we can reference has fsInput.baseArrayLayer
in the fragment shader.
The cubemap code converts a 2d-array layer and normalized UV coordinate into a cubemap 3d coordinate. We need this because again, in compatibility mode, a cubemap can only be viewed as a cubemap.
Back to our JavaScript, we need to read the textureBindingViewDimension property
from the texture. Note that this value is undefined if we are not in compatibility
mode. But, we can just assumed '2d-array' in that case since in norm “core” webgpu,
'2d-array' should always work
  const generateMips = (() => {
    let sampler;
    let module;
    const pipelineByFormat = {};

    return function generateMips(device, texture) {
+      // If the texture doesn't have a textureBindingViewDimension then use '2d-array'
+      const textureBindingViewDimension = texture.textureBindingViewDimension ?? '2d-array';
      if (!module) {
        module = device.createShaderModule({
          label: 'textured quad shaders for mip level generation',
          code: /* wgsl */ `
            const faceMat = array(
              mat3x3f( 0,  0,  -2,  0, -2,   0,  1,  1,   1),   // pos-x
              mat3x3f( 0,  0,   2,  0, -2,   0, -1,  1,  -1),   // neg-x
              mat3x3f( 2,  0,   0,  0,  0,   2, -1,  1,  -1),   // pos-y
              mat3x3f( 2,  0,   0,  0,  0,  -2, -1, -1,   1),   // neg-y
              mat3x3f( 2,  0,   0,  0, -2,   0, -1,  1,   1),   // pos-z
              mat3x3f(-2,  0,   0,  0, -2,   0,  1,  1,  -1));  // neg-z

            struct VSOutput {
              @builtin(position) position: vec4f,
              @location(0) texcoord: vec2f,
              @location(1) @interpolate(flat, either) baseArrayLayer: u32,
            };

            @vertex fn vs(
              @builtin(vertex_index) vertexIndex : u32,
              @builtin(instance_index) baseArrayLayer: u32,
            ) -> VSOutput {
              var pos = array<vec2f, 3>(
                vec2f(-1.0, -1.0),
                vec2f(-1.0,  3.0),
                vec2f( 3.0, -1.0),
              );

              var vsOutput: VSOutput;
              let xy = pos[vertexIndex];
              vsOutput.position = vec4f(xy, 0.0, 1.0);
              vsOutput.texcoord = xy * vec2f(0.5, -0.5) + vec2f(0.5);
              vsOutput.baseArrayLayer = baseArrayLayer;
              return vsOutput;
            }

            @group(0) @binding(0) var ourSampler: sampler;

            @group(0) @binding(1) var ourTexture2d: texture_2d<f32>;
            @fragment fn fs2d(fsInput: VSOutput) -> @location(0) vec4f {
              return textureSample(ourTexture2d, ourSampler, fsInput.texcoord);
            }

            @group(0) @binding(1) var ourTexture2dArray: texture_2d_array<f32>;
            @fragment fn fs2darray(fsInput: VSOutput) -> @location(0) vec4f {
              return textureSample(
                ourTexture2dArray,
                ourSampler,
                fsInput.texcoord,
                fsInput.baseArrayLayer);
            }

            @group(0) @binding(1) var ourTextureCube: texture_cube<f32>;
            @fragment fn fscube(fsInput: VSOutput) -> @location(0) vec4f {
              return textureSample(
                ourTextureCube,
                ourSampler,
                faceMat[fsInput.baseArrayLayer] * vec3f(fract(fsInput.texcoord), 1));
            }
          `,
        });

        sampler = device.createSampler({
          minFilter: 'linear',
          magFilter: 'linear',
        });
      }

    ...
Before we tracked a pipeline per format so we could reuse the pipeline for textures of the same format. We need to update that to be a pipeline per format per viewDimension.
  const generateMips = (() => {
    let sampler;
    let module;
-    const pipelineByFormat = {};
+    const pipelineByFormatAndView = {};

    return function generateMips(device, texture, textureBindingViewDimension) {
      // If the texture doesn't have a textureBindingViewDimension then use '2d-array'.
      // This will be true in core webgpu mode.
      const textureBindingViewDimension = texture.textureBindingViewDimension ?? '2d-array';
      let module = moduleByViewDimension[textureBindingViewDimension];
      if (!module) {
        ...
      }

+      const id = `${texture.format}.${textureBindingViewDimension}`;

-      if (!pipelineByFormat[texture.format]) {
-        pipelineByFormat[texture.format] = device.createRenderPipeline({
-          label: 'mip level generator pipeline',
+      if (!pipelineByFormatAndView[id]) {
+        // chose an fragment shader based on the viewDimension (removes the '-' from 2d-array and cube-array)
+        const entryPoint = `fs${textureBindingViewDimension.replace(/[\W]/, '')}`;
+        pipelineByFormatAndView[id] = device.createRenderPipeline({
+          label: `mip level generator pipeline for ${textureBindingViewDimension}, format: ${texture.format}`,
          layout: 'auto',
          vertex: {
            module,
          },
          fragment: {
            module,
            entryPoint,
            targets: [{ format: texture.format }],
          },
        });
      }
-      const pipeline = pipelineByFormat[texture.format];
+      const pipeline = pipelineByFormatAndView[id];

      ...
}
Then our loop to generate the mipmap needs to change to use the full layers, since compatibility mode does not allow a sub-range of layers. We also need to use our ability to pass in the instance index via draw to select the layer we want to read from.
  const generateMips = (() => {

      ...

      const pipeline = pipelineByFormatAndView[id];

      for (let baseMipLevel = 1; baseMipLevel < texture.mipLevelCount; ++baseMipLevel) {
        for (let layer = 0; layer < texture.depthOrArrayLayers; ++layer) {
          const bindGroup = device.createBindGroup({
            layout: pipeline.getBindGroupLayout(0),
            entries: [
              { binding: 0, resource: sampler },
              {
                binding: 1,
                resource: texture.createView({
-                  dimension: '2d',
+                  dimension: textureBindingViewDimension,
                  baseMipLevel: baseMipLevel - 1,
                  mipLevelCount: 1,
-                  baseArrayLayer: layer,
-                  arrayLayerCount: 1,
                }),
              },
            ],
          });

          const renderPassDescriptor = {
            label: 'our basic canvas renderPass',
            colorAttachments: [
              {
                view: texture.createView({
                  dimension: '2d',
                  baseMipLevel,
                  mipLevelCount: 1,
                  baseArrayLayer: layer,
                  arrayLayerCount: 1,
                }),
                loadOp: 'clear',
                storeOp: 'store',
              },
            ],
          };

          const pass = encoder.beginRenderPass(renderPassDescriptor);
          pass.setPipeline(pipeline);
          pass.setBindGroup(0, bindGroup);
-          pass.draw(6);
+          // draw 3 vertices, 1 instance, first instance (instance_index) = layer
+          pass.draw(3, 1, 0, layer);
          pass.end();
        }
      }

      const commandBuffer = encoder.finish();
      device.queue.submit([commandBuffer]);
    };
  })();
With that our mipmap generation code works in compatibility mode, and it still works in core WebGPU.
We have a few other things we need to update to make the example work though.
We have a function createTextureFromSources that we pass sources
to and it creates a texture. It was always creating a '2d' texture
since in core we can view a '2d' texture with 6 layers as a cubemap.
Instead, we need to make it so we can pass in a textureBindingViewDimension and/or
a dimension so that when we create the texture we can tell compatibility
mode how we will view it.
+  function textureViewDimensionToDimension(viewDimension) {
+   switch (viewDimension) {
+      case '1d': return '1d';
+      case '3d': return '3d';
+      default: return '2d';
+    }
+  }

  function createTextureFromSources(device, sources, options = {}) {
+    const viewDimension = options.dimension ??
+      getDefaultViewDimensionForTexture(options.textureBindingViewDimension);
+    const dimension = options.dimension ?? textureViewDimensionToDimension(viewDimension);
    // Assume are sources all the same size so just use the first one for width and height
    const source = sources[0];
    const texture = device.createTexture({
      format: 'rgba8unorm',
      mipLevelCount: options.mips ? numMipLevels(source.width, source.height) : 1,
      size: [source.width, source.height, sources.length],
      usage: GPUTextureUsage.TEXTURE_BINDING |
             GPUTextureUsage.COPY_DST |
             GPUTextureUsage.RENDER_ATTACHMENT,
+      dimension,
+      textureBindingViewDimension: options.textureBindingViewDimension,
    });
    copySourcesToTexture(device, texture, sources, options);
    return texture;
  }
And, we need to update our call to createTextureFromSources to tell it in advance
that we want a cubemap.
  const texture = await createTextureFromSources(
-      device, faceCanvases, {mips: true, flipY: false});
+      device, faceCanvases, {mips: true, flipY: false, textureBindingViewDimension: 'cube'});
To make the example run in compatibility mode we need to request it like we covered at the top of this article.
async function main() {
-  const adapter = await navigator.gpu?.requestAdapter()
+  const adapter = await navigator.gpu?.requestAdapter({
+    featureLevel: 'compatibility',
+  });
  const device = await adapter?.requestDevice();

  ...
And with that, our cube map sample works in compatibility mode.
You now have a compatibility mode friendly generateMips which you could
use in any of the examples on this site. It works on both core and compatibility mode.
In compatibility mode you must pass in a textureBindingViewDimension if you want a cube map or if
you want a 1 layer 2d-array. In core WebGPU you can pass one in or not. It doesn’t matter.
Minor limits and restrictions
The following are limits and restrictions most programs are unlikely to run into
-
Color blending must match on all color targets.
In core, when you create a render pipeline, each color target can specify blending settings. We used blending settings in the article on blending and transparency. In compatibility mode, all the settings across all color targets in a single pipeline must be the same.
-
copyTextureToBufferandcopyTextureToTexturedo not work with compressed textures -
copyTextureToTexturedoes not work with multisampled textures -
cube-arrayis not supported -
views of a textures may not differ in aspect or mip levels in a single draw/dispatch call.
In core WebGPU you can make multiple texture views of a texture to different mip levels AND use them in the same draw call. This is uncommon. Note that this restriction is on
TEXTURE_BINDINGusage, using a texture via a bindGroup. You can still use a different view as aRENDER_ATTACHMENTas we did in the mipmap generation code above. -
@builtin(sample_mask)and@builtin(sample_index)are not supported -
rg32uint,rg32sintandrg32floattexture formats can not be used as storage textures. -
depthClampBiasmust be 0This is a setting when creating a render pipeline.
-
@interpolation(linear)and@interpolation(..., sample)are not supportedThese were briefly mentioned in the article on inter-stage variables.
-
@interpolate(flat)and@interpolate(flat, first)are not supportedIn compatibility mode you must use
@interpolate(flat, either)when you want flat interpolation.eithermeans the value passed to the fragment shader could be the value from either the first or last vertex of the triangle or line being drawn. It’s up to the implementation.It is common for this not to matter. The most common use cases for passing something with flat interpolation from the vertex shader to the fragment shader are usually per model, per material, or per instance types of values. For example the mipmap generation code above used flat interpolation above to pass the
instance_indexto the fragment shader. It will be the same for all vertices of a triangle and so works just fine with@interpolate(flat, either) -
Texture formats can not be reinterpreted
In core WebGPU you can create an
'rgba8unorm'texture and view it as an'rgba8unorm-srgb'texture and visa-versa as well as other'-srgb'formats and their corresponding non'-srgb'formats. Compatibility mode does not allow this. Whatever format you create the texture is the only format it can be used as. -
bgra8unorm-srgbis not supported. -
rgba16floatandr32floattextures can not be multisampled. -
All integer texture formats can not be multisampled.
-
depthOrArrayLayersmust be compatible withtextureBindingViewDimensionThis means a texture marked with
textureBindingViewDimension: '2d'must have adepthOrArrayLayers: 1(the default). A texture marked withtextureBindingViewDimension: 'cube'must havedepthOrArrayLayers: 6. -
textureLoaddoes not work with depth textures.A “depth texture” is a texture referenced in WGSL with
texture_depth,texture_depth_2d_array, ortexture_depth_cube. Those can not be used withtextureLoadin compatibility mode.On the other hand,
textureLoadcan be used withtexture_2d<f32>,texture_2d_array<f32>andtexture_cube<f32>and a texture that has a depth format can be bound to these bindings… -
depth textures can not be used with non-comparison samplers.
Again, a “depth texture” is a texture referenced in WGSL with
texture_depth,texture_depth_2d_array, ortexture_depth_cube. Those can not be used with a non-comparison sampler in compatibility mode.This effectively means
texture_depth,texture_depth_2d_array, andtexture_depth_cubecan only be used withtextureSampleCompare,textureSampleCompareLevelandtextureGatherComparein compatibility mode.On the other hand, you can bind a texture that uses a depth format to a
texture_2d<f32>,texture_2d_array<f32>andtexture_cube<f32>binding, subject to the normal restriction that it must use a non-filtering sampler. -
fine derivatives are not supported
The WGSL functions
dpdxFine,dpdyFineandfwidthFineare not supported in compatibility mode. You can still usedpdxdpdxCoarse,dpdy,dpdyCoarse,fwidth, andfwidthCoarse -
The combinations of texture + sampler are more limited
In core you can bind 16+ textures and 16+ samplers and then in your shader you can use all 256+ combinations.
In compatibility mode you can only use 16 total combinations in a single stage.
The actual rule is a little more complicated. Here it is spelled out in pseudo code.
maxCombinationsPerStage = min(device.limits.maxSampledTexturesPerShaderStage, device.limits.maxSamplersPerShaderStage) for each stage of the pipeline: sum = 0 for each texture binding in the pipeline layout which is visible to that stage: sum += max(1, number of texture sampler combos for that texture binding) for each external texture binding in the pipeline layout which is visible to that stage: sum += 1 // for LUT texture + LUT sampler sum += 3 * max(1, number of external_texture sampler combos) // for Y+U+V if sum > maxCombinationsPerStage generate a validation error. -
Some of the default limits are lower in compatibility mode
limit compat core maxColorAttachments4 8 maxComputeInvocationsPerWorkgroup128 256 maxComputeWorkgroupSizeX128 256 maxComputeWorkgroupSizeY128 256 maxInterStageShaderVariables15 16 maxTextureDimension1D4096 8192 maxTextureDimension2D4096 8192 maxUniformBufferBindingSize16384 65536 maxVertexAttributes16a 16 (a) In compatibility mode, using
@builtin(vertex_index)and/or@builtin(instance_index)each count as an attribute.Of course the adapter may support higher limits for any of these.
-
There are 4 new limits.
maxStorageBuffersInVertexStage(default 0)maxStorageTexturesInVertexStage(default 0)maxStorageBuffersInFragmentStage(default 4)maxStorageTexturesInFragmentStage(default 4)
Like other limits, you can check when you request an adapter what the adapter supports and require higher than the defaults if you need more.
As mentioned above, about 45% of devices support
0storage buffers and storage textures in vertex shaders.
Upgrading from compatibility mode to core
Compatibility mode was designed for you to opt-in. If you can design your application to live with the restrictions above then you ask for compatibility mode. If not, ask for core, the default, if the device can’t handle core it will not return an adapter.
On the the other hand, you can also to design your app to function in compatibility mode but take advantage of all the core features if the user has a device that supports core WebGPU.
To do this, ask for a compatibility mode adapter, then check
for and enable the core-features-and-limits feature. If it
exists on the adapter AND you require it on the device the
device will be a core device and none of the restrictions above
will apply.
Example:
const adapter = await navigator.gpu.requestAdapter({
  featureLevel: 'compatibility',
});
const hasCore = adapter.features.has('core-features-and-limits');
const device = await adapter.requestDevice({
  requiredFeatures: [
    ...(hasCore ? ['core-features-and-limits'] : []),
  ],
});
If hasCore is true then none of the above restrictions and limits apply.
Note that other code that wants to check if the device is a core or compatibility device should check the device’s features.
const isCore = device.features.has('core-features-and-limits');
This will always be true on a core device.
Testing compatibility mode
On a browser that supports compatibility mode you can test your
application follows the restrictions by NOT requesting 'core-features-and-limits' (as we did at the top).
You may want to check that you actually have a compatibility
device so you can know that the restrictions and limits are
being enforced.
const adapter = await navigator.gpu.requestAdapter({
  featureLevel: 'compatibility',
});
const device = await adapter.requestDevice();

const isCompatibilityMode = !device.features.has('core-features-and-limits');
This is a good way to test if your app will run on these older devices.
Quick test via the webgpu-dev-extension
Using webgpu-dev-extension you can force your app to use compatibility mode as a quick test with no changes to your app. You can also test an app that auto-upgrades to core webgpu, works when it gets compatibility mode.
Steps:
-
Open devtools and run your app
-
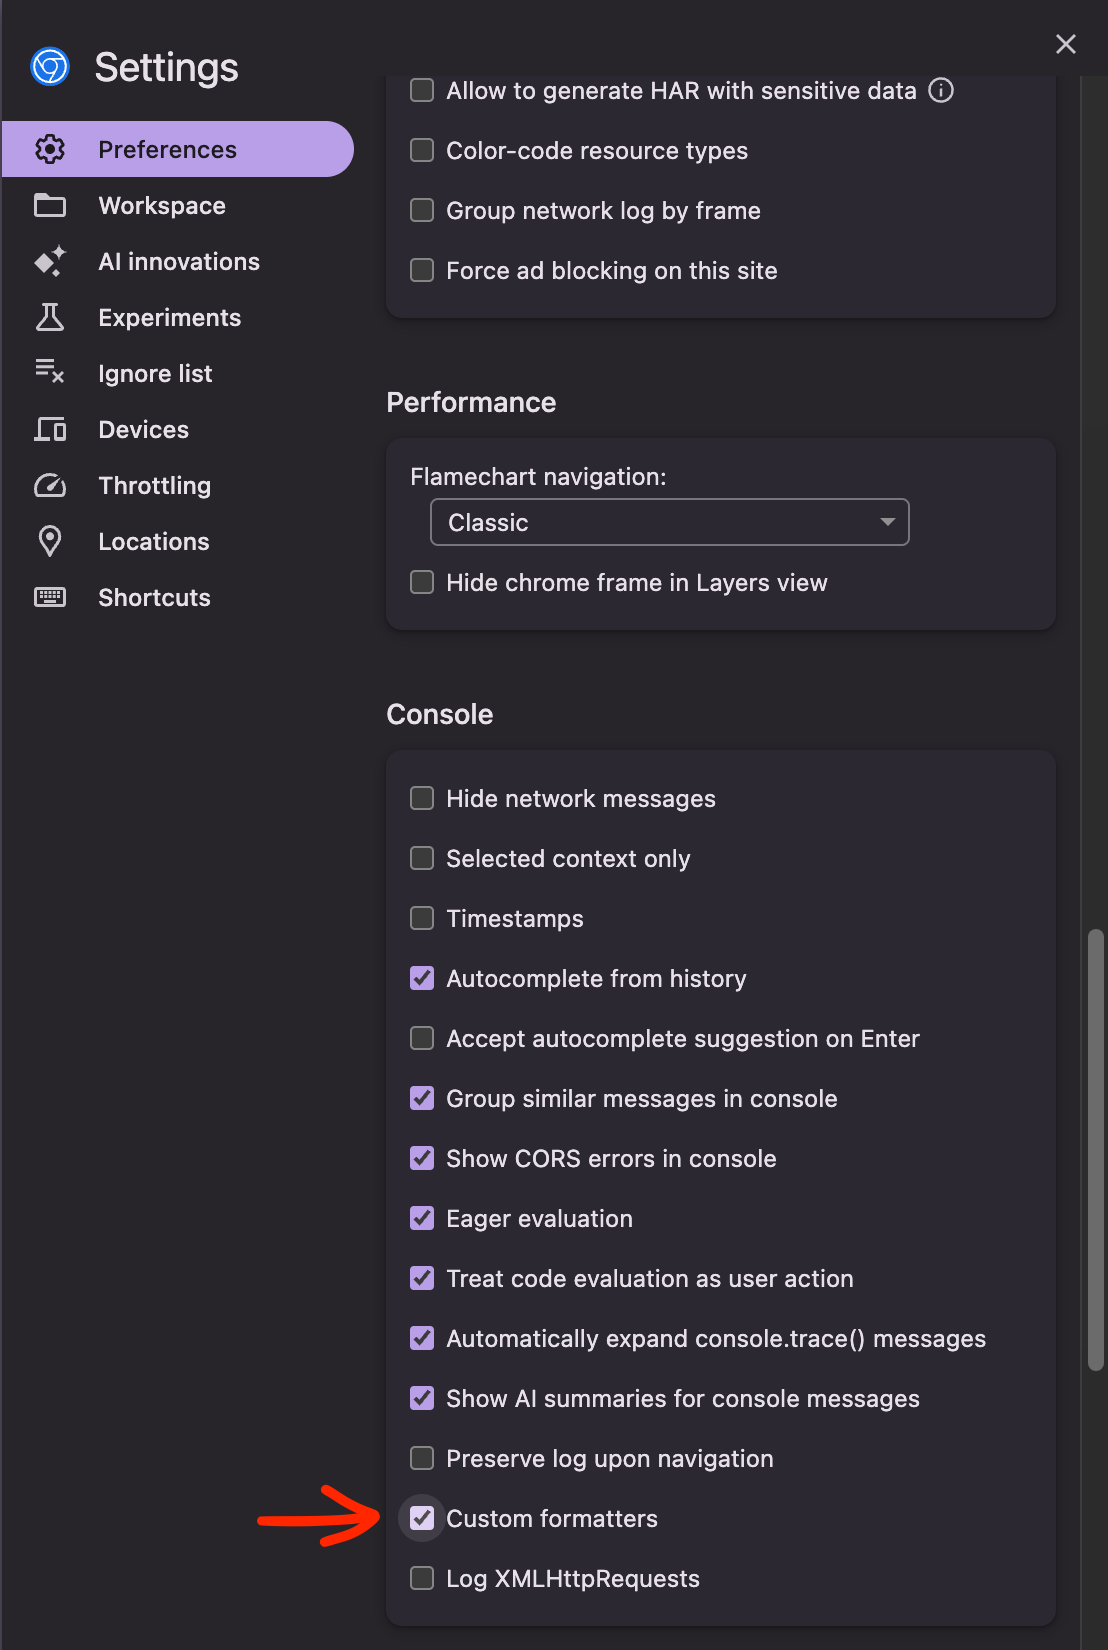
In Devtools, open the settings

-
Turn on ‘Custom Formatters’
-
In the WebGPU-Dev-Extension, select these options:
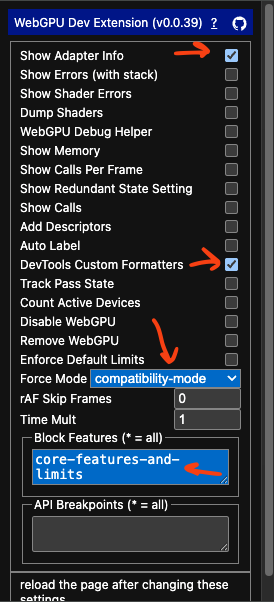
-
Force Mode: ‘compatibility-mode’
This makes the app do
navigator.gpu.requestAdapter({ featureLevel: 'compatibility' });Leave this at the default of your app already supports compatibility mode.
-
Block Features ‘core-features-and-limits’
This makes it so the app can’t request core mode
-
DevTools Custom Formatters
This makes so if you inspect the device in devtools it will show device.features as an array of strings. Without this, the devtools shows an opaque object so you can’t see the features
-
Show Adapter Info
This option makes it do console.log(adapter) and console.log(device) any time a new adapter or device is created. This lets you verify the device is in compatibility mode. You can check device.features and see that it doesn’t have ‘core-features-and-limits’
-
-
Refresh the page
-
Verify your app is running in compatibility mode
In the JavaScript console you should see something like this
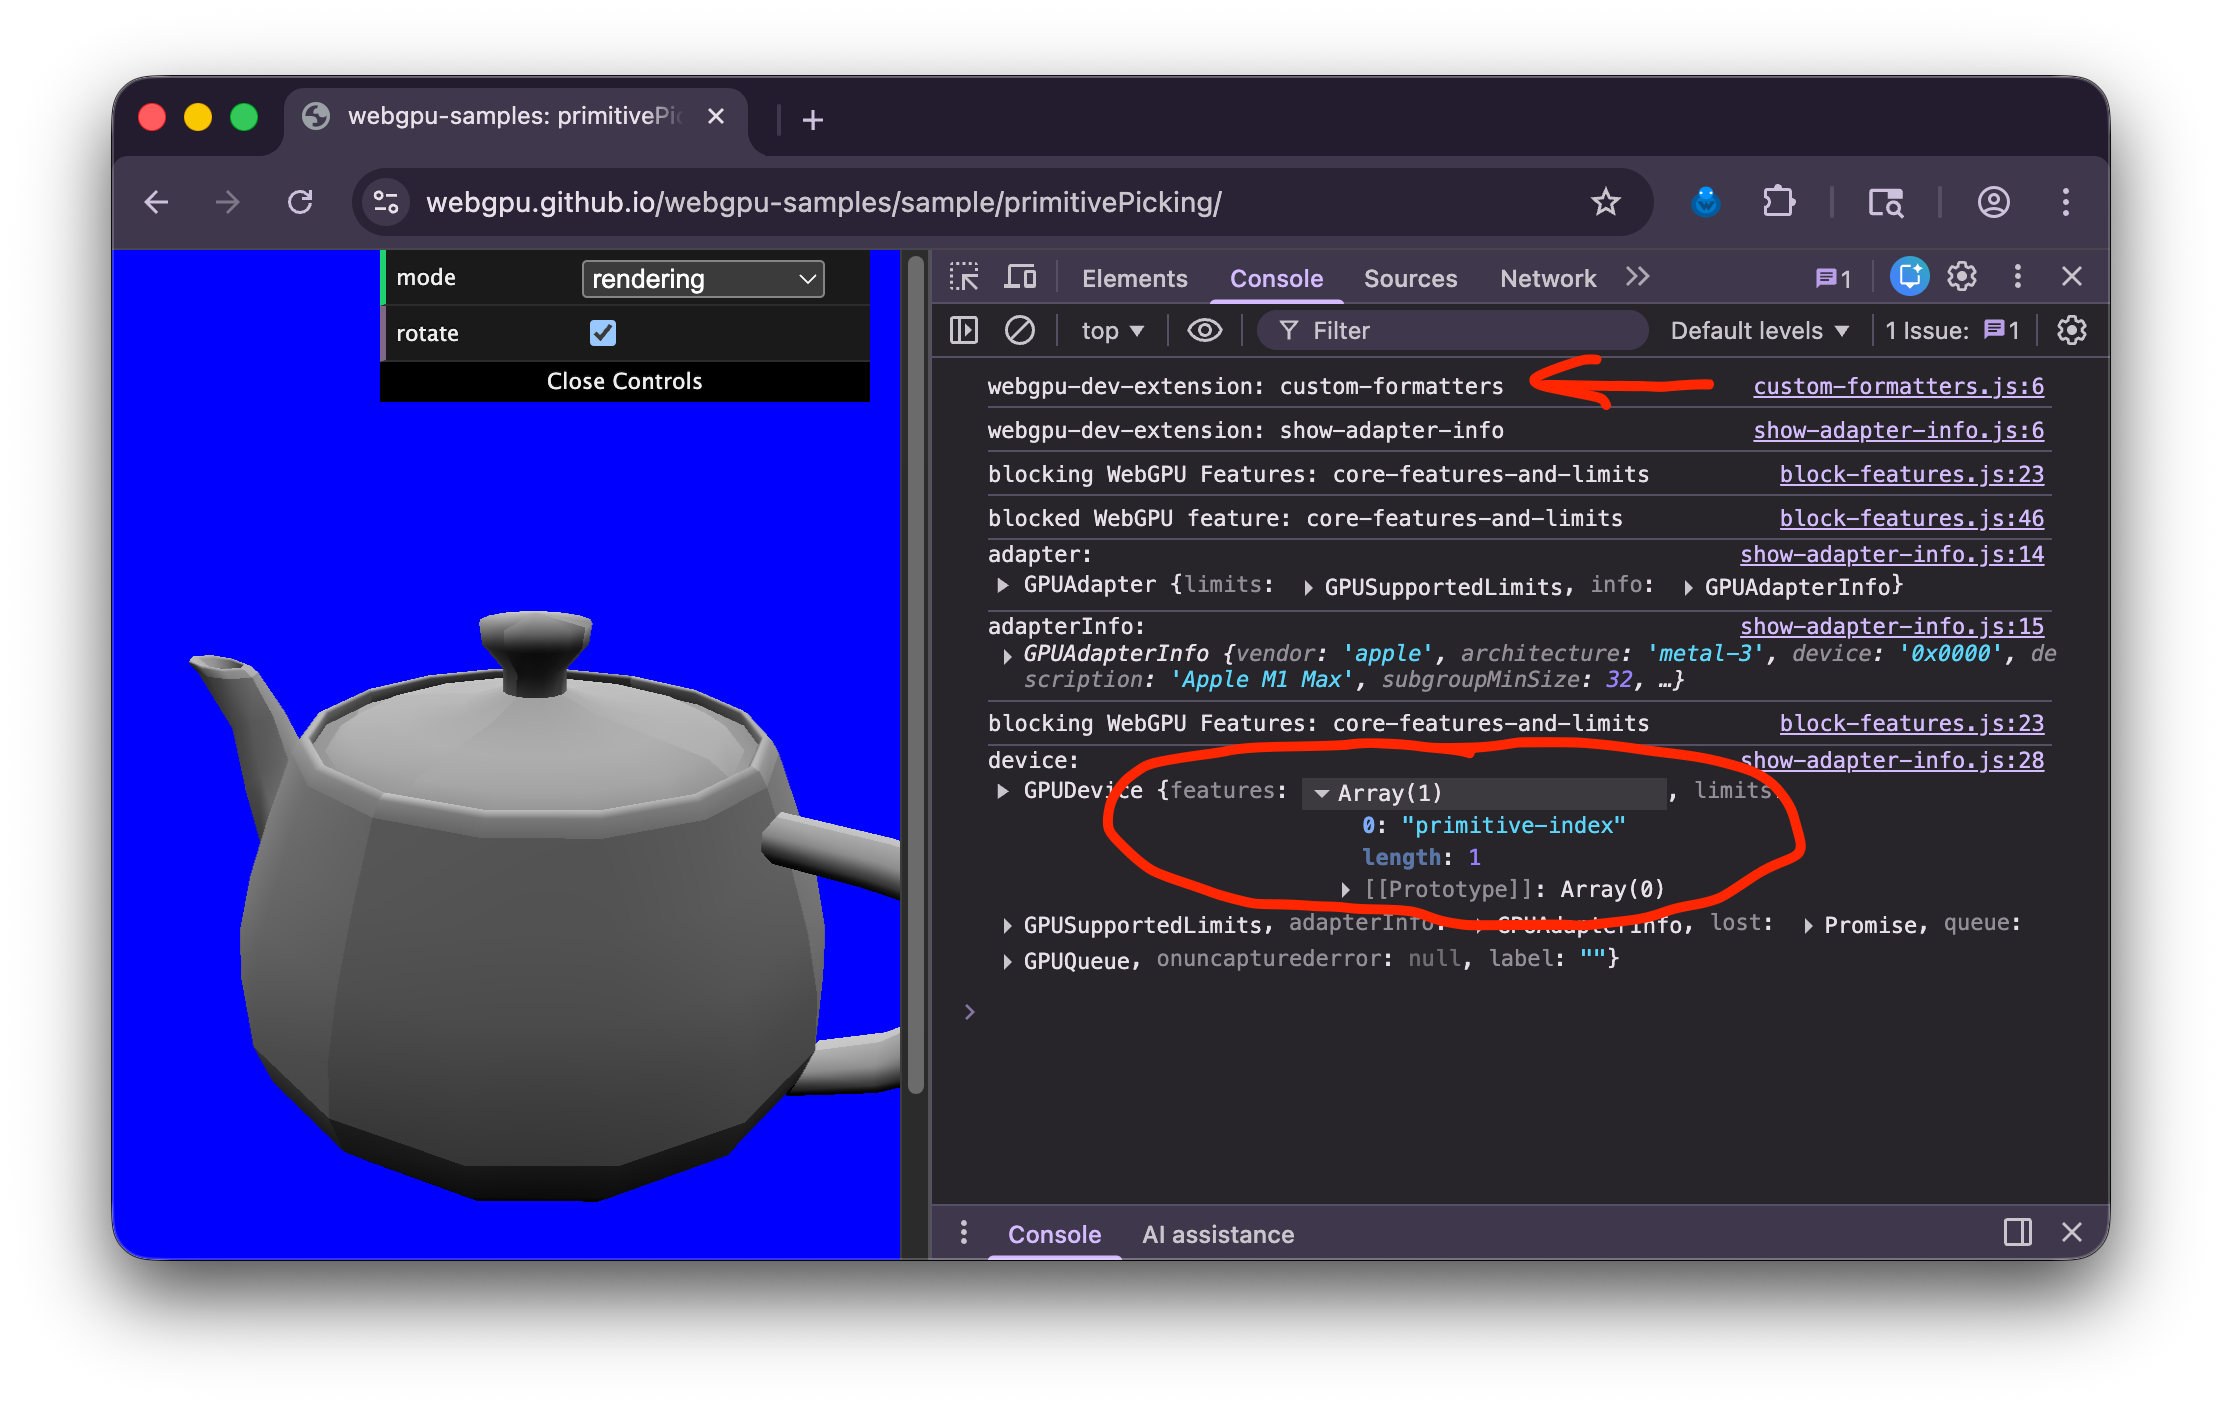
Look for webgpu-dev-extension: custom-formatters near the top to verify the formatters
were injected into the page
Then, look for GPUDevice and expand the features. Make sure you DO NOT SEE
"core-features-and-limits".
Examples:
As of 2026-02-01, all of the local examples at webgpu-samples work, and 185 of the 193 webgpu examples at threejs.org/examples work in compatibility mode. The remaining 8 may be updated to also work in compatibility mode in the future with minor adjustments.