WebGPUの透明度とブレンディング
透明度とブレンディングについて説明するのは難しいです。なぜなら、ある状況で必要なことは、別の状況で必要なこととは異なることが多いからです。したがって、この記事は主にWebGPUの機能のツアーになり、特定のテクニックについて説明するときにここを参照できるようにします。
キャンバスのalphaMode
最初に注意すべきことは、WebGPU内には透明度とブレンディングがありますが、WebGPUキャンバスとHTMLページにも透明度とブレンディングがあるということです。
デフォルトでは、WebGPUキャンバスは不透明です。そのアルファチャネルは無視されます。無視されないようにするには、configureを呼び出すときにalphaModeを'premultiplied'に設定する必要があります。デフォルトは'opaque'です。
  context.configure({
    device,
    format: presentationFormat,
+    alphaMode: 'premultiplied',
  });
alphaMode: 'premultiplied'が何を意味するかを理解することが重要です。これは、キャンバスに入力する色の色値が、すでにアルファ値で乗算されている必要があることを意味します。
できるだけ小さな例を作成しましょう。レンダーパスを作成し、クリアカラーを設定するだけです。
async function main() {
  const adapter = await navigator.gpu?.requestAdapter();
  const device = await adapter?.requestDevice();
  if (!device) {
    fail('need a browser that supports WebGPU');
    return;
  }

  // Get a WebGPU context from the canvas and configure it
  const canvas = document.querySelector('canvas');
  const context = canvas.getContext('webgpu');
  const presentationFormat = navigator.gpu.getPreferredCanvasFormat();
  context.configure({
    device,
    format: presentationFormat,
+    alphaMode: 'premultiplied',
  });

  const clearValue = [1, 0, 0, 0.01];
  const renderPassDescriptor = {
    label: 'our basic canvas renderPass',
    colorAttachments: [
      {
        // view: <- to be filled out when we render
        clearValue,
        loadOp: 'clear',
        storeOp: 'store',
      },
    ],
  };

  function render() {
    const encoder = device.createCommandEncoder({ label: 'clear encoder' });
    const canvasTexture = context.getCurrentTexture();
    renderPassDescriptor.colorAttachments[0].view =
        canvasTexture.createView();

    const pass = encoder.beginRenderPass(renderPassDescriptor);
    pass.end();

    const commandBuffer = encoder.finish();
    device.queue.submit([commandBuffer]);
  }

  const observer = new ResizeObserver(entries => {
    for (const entry of entries) {
      const canvas = entry.target;
      const width = entry.contentBoxSize[0].inlineSize;
      const height = entry.contentBoxSize[0].blockSize;
      canvas.width = Math.max(1, Math.min(width, device.limits.maxTextureDimension2D));
      canvas.height = Math.max(1, Math.min(height, device.limits.maxTextureDimension2D));
      render();
    }
  });
  observer.observe(canvas);
}
キャンバスのCSS背景を灰色のチェッカーボードに設定しましょう。
canvas {
  background-color: #404040;
  background-image:
     linear-gradient(45deg, #808080 25%, transparent 25%),
     linear-gradient(-45deg, #808080 25%, transparent 25%),
     linear-gradient(45deg, transparent 75%, #808080 75%),
     linear-gradient(-45deg, transparent 75%, #808080 75%);
  background-size: 32px 32px;
  background-position: 0 0, 0 16px, 16px -16px, -16px 0px;
}
それに、クリア値のアルファと色、およびそれが事前乗算されているかどうかを設定できるUIを追加しましょう。
+import GUI from '../3rdparty/muigui-0.x.module.js';

...

+  const color = [1, 0, 0];
+  const settings = {
+    premultiply: false,
+    color,
+    alpha: 0.01,
+  };
+
+  const gui = new GUI().onChange(render);
+  gui.add(settings, 'premultiply');
+  gui.add(settings, 'alpha', 0, 1);
+  gui.addColor(settings, 'color');

  function render() {
    const encoder = device.createCommandEncoder({ label: 'clear encoder' });
    const canvasTexture = context.getCurrentTexture();
    renderPassDescriptor.colorAttachments[0].view =
        canvasTexture.createView();

+    const { alpha } = settings;
+    clearValue[3] = alpha;
+    if (settings.premultiply) {
+      // 色をアルファで事前乗算します
+      clearValue[0] = color[0] * alpha;
+      clearValue[1] = color[1] * alpha;
+      clearValue[2] = color[2] * alpha;
+    } else {
+      // 事前乗算されていない色を使用します
+      clearValue[0] = color[0];
+      clearValue[1] = color[1];
+      clearValue[2] = color[2];
+    }

    const pass = encoder.beginRenderPass(renderPassDescriptor);
    pass.end();

    const commandBuffer = encoder.finish();
    device.queue.submit([commandBuffer]);
  }
これを実行すると、問題が発生することがわかると思います。
ここに表示される色は未定義です!!!
私のマシンでは、これらの色になりました。
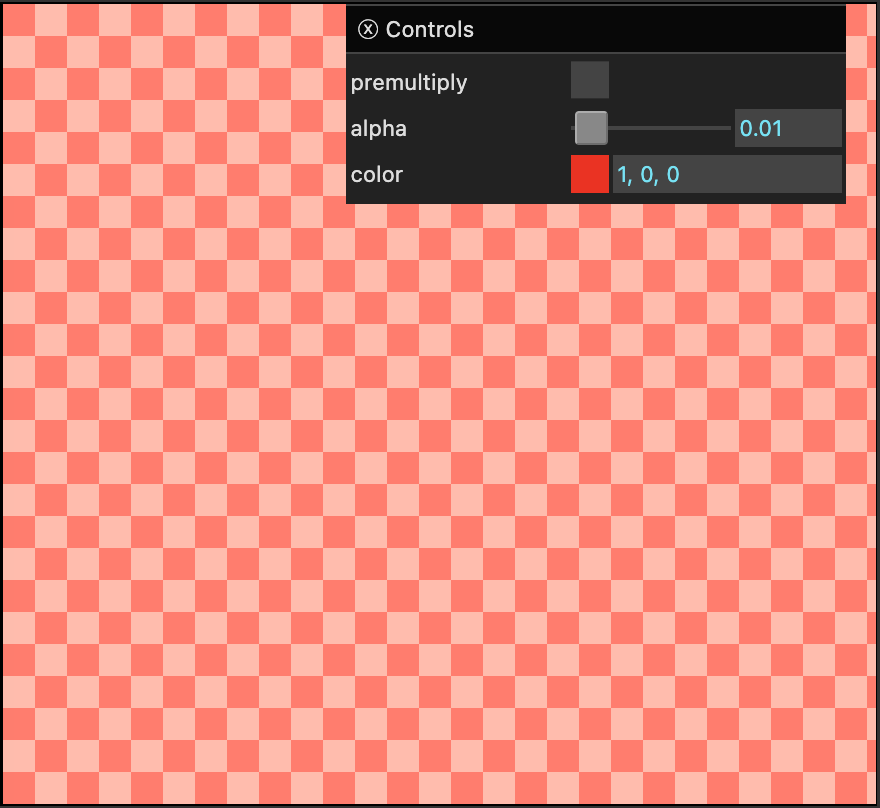
何が問題かわかりますか?アルファを0.01に設定しました。背景色は中程度の灰色と濃い灰色のはずです。色は赤(1、0、0)に設定されています。中程度/濃い灰色のチェッカーボードの上に0.01の量の赤を置くと、ほとんど知覚できないはずですが、なぜ2つの明るいピンクの色合いなのでしょうか?
その理由は、これは不正な色です!。キャンバスの色は1, 0, 0, 0.01ですが、これは事前乗算された色ではありません。「事前乗算」とは、キャンバスに入力する色が、すでにアルファ値で乗算されている必要があることを意味します。アルファ値が0.01の場合、他の値は0.01より大きくてはなりません。
「事前乗算」チェックボックスをクリックすると、コードは色を事前乗算します。キャンバスに入力される値は0.01, 0, 0, 0.01になり、正しく表示され、ほとんど知覚できなくなります。
「事前乗算」をチェックした状態で、アルファを調整すると、アルファが1に近づくにつれて赤にフェードすることがわかります。
注:例
1, 0, 0, 0.01は不正な色であるため、どのように表示されるかは未定義です。不正な色で何が起こるかはブラウザ次第なので、不正な色を使用して、デバイス間で同じ結果を期待しないでください。
色が1、0.5、0.25(オレンジ色)で、33%透明にしたいので、アルファが0.33だとします。その場合、「事前乗算された色」は次のようになります。
                      事前乗算
   ---------------------------------
   r = 1    * 0.33   = 0.33
   g = 0.5  * 0.33   = 0.165
   g = 0.25 * 0.33   = 0.0825
   a = 0.33          = 0.33
事前乗算された色をどのように取得するかはあなた次第です。事前乗算されていない色がある場合は、シェーダーで次のようなコードで事前乗算できます。
return vec4f(color.rgb * color.a, color.a)`;
テクスチャのインポートに関する記事で説明したcopyExternalImageToTexture関数は、premultipliedAlpha: trueオプションを受け取ります。(下記参照)これは、copyExternalImageToTextureを呼び出して画像をテクスチャに読み込むときに、テクスチャにコピーするときにWebGPUに色を事前乗算するように指示できることを意味します。そうすれば、textureSampleを呼び出すときに取得する値はすでに事前乗算されています。
このセクションのポイントは次のとおりです。
-
alphaMode: 'premultiplied'WebGPUキャンバス構成オプションを説明するため。これにより、WebGPUキャンバスに透明度を持たせることができます。
-
事前乗算されたアルファ色の概念を紹介するため。
事前乗算された色をどのように取得するかはあなた次第です。上記の例では、JavaScriptで事前乗算された
clearValueを作成しました。フラグメントシェーダー(および/または)他のシェーダーから色を返すこともできます。それらのシェーダーに事前乗算された色を提供できます。シェーダー自体で乗算を行う場合があります。色を事前乗算するために後処理パスを実行する場合があります。重要なのは、
alphaMode: 'premultiplied'を使用している場合、キャンバスの色が、何らかの方法で、最終的に事前乗算されることです。事前乗算された色と事前乗算されていない色のその他の良い参考文献は、次の記事です。 GPUは事前乗算を好む。
破棄
discardは、フラグメントシェーダーで使用して現在のフラグメントを破棄したり、言い換えれば、ピクセルを描画しないようにしたりできるWGSLステートメントです。
ステージ間変数に関する記事の@builtin(position)を使用して、フラグメントシェーダーでチェッカーボードを描画する例を取り上げましょう。
2色のチェッカーボードを描画する代わりに、2つのケースのいずれかを破棄します。
@fragment fn fs(fsInput: OurVertexShaderOutput) -> @location(0) vec4f {
-  let red = vec4f(1, 0, 0, 1);
  let cyan = vec4f(0, 1, 1, 1);

  let grid = vec2u(fsInput.position.xy) / 8;
  let checker = (grid.x + grid.y) % 2 == 1;

+        if (checker) {
+          discard;
+        }
+
+        return cyan;

-  return select(red, cyan, checker);
}
いくつかの他の変更として、キャンバスにCSSチェッカーボードの背景を持たせるために上記のCSSを追加します。また、alphaMode: 'premultiplied'を設定します。そして、clearValueを[0, 0, 0, 0]に設定します。
  context.configure({
    device,
    format: presentationFormat,
+    alphaMode: 'premultiplied',
  });

  ...

  const renderPassDescriptor = {
    label: 'our basic canvas renderPass',
    colorAttachments: [
      {
        // view: <- to be filled out when we render
-        clearValue: [0.3, 0.3, 0.3, 1],
+        clearValue: [0, 0, 0, 0],
        loadOp: 'clear',
        storeOp: 'store',
      },
    ],
  };
...
他のすべての正方形が「透明」であり、描画さえされていないことがわかるはずです。
透明度に使用されるシェーダーでは、アルファ値に基づいて破棄するのが一般的です。次のようなものです。
@fragment fn fs(fsInput: OurVertexShaderOutput) -> @location(0) vec4f {
    let color = ... compute a color ....

    if (color.a < threshold) {
      discard;
    }

    return color;
}
ここで、thresholdは、ユニフォームからの値、定数、または適切なものであってもかまいません。
これは、スプライトや、草や葉のような葉に使用されるのが最も一般的です。なぜなら、描画していて、正射影に関する記事で導入した深度テクスチャを使用している場合、スプライト、葉、または草の葉を描画すると、現在描画しているものの後ろにあるスプライト、葉、または草は、アルファ値が0であっても、深度テクスチャをまだ更新しているため、描画されません。したがって、描画する代わりに破棄します。これについては、別の記事で詳しく説明します。
ブレンド設定
最後に、ブレンド設定について説明します。レンダーパイプラインを作成するとき、フラグメントシェーダーの各targetに対して、ブレンディング状態を設定できます。つまり、これまでの他の例の典型的なパイプラインは次のとおりです。
    const pipeline = device.createRenderPipeline({
      label: 'hardcoded textured quad pipeline',
      layout: pipelineLayout,
      vertex: {
        module,
      },
      fragment: {
        module,
        targets: [
          {
            format: presentationFormat,
          },
        ],
      },
    });
そして、target[0]にブレンディングを追加したものは次のとおりです。
    const pipeline = device.createRenderPipeline({
      label: 'hardcoded textured quad pipeline',
      layout: pipelineLayout,
      vertex: {
        module,
      },
      fragment: {
        module,
        targets: [
          {
            format: presentationFormat,
+            blend: {
+              color: {
+                srcFactor: 'one',
+                dstFactor: 'one-minus-src-alpha'
+              },
+              alpha: {
+                srcFactor: 'one',
+                dstFactor: 'one-minus-src-alpha'
+              },
+            },
          },
        ],
      },
    });
デフォルト設定の完全なリストは次のとおりです。
blend: {
  color: {
    operation: 'add',
    srcFactor: 'one',
    dstFactor: 'zero',
  },
  alpha: {
    operation: 'add',
    srcFactor: 'one',
    dstFactor: 'zero',
  },
}
ここで、colorは色のrgb部分に何が起こるかであり、alphaはa(アルファ)部分に何が起こるかです。
operationは次のいずれかになります。
- ‘add’
- ‘subtract’
- ‘reverse-subtract’
- ‘min’
- ‘max’
srcFactorとdstFactorは、それぞれ次のいずれかになります。
- ‘zero’
- ‘one’
- ‘src’
- ‘one-minus-src’
- ‘src-alpha’
- ‘one-minus-src-alpha’
- ‘dst’
- ‘one-minus-dst’
- ‘dst-alpha’
- ‘one-minus-dst-alpha’
- ‘src-alpha-saturated’
- ‘constant’
- ‘one-minus-constant’
ほとんどは、比較的簡単に理解できます。次のように考えてください。
result = operation((src * srcFactor), (dst * dstFactor))
ここで、srcはフラグメントシェーダーから返される値であり、dstは描画しているテクスチャにすでにある値です。
operationが'add'、srcFactorが'one'、dstFactorが'zero'であるデフォルトを考えてみましょう。これにより、次のようになります。
   result = add((src * 1), (dst * 0))
   result = add(src * 1, dst * 0)
   result = add(src, 0)
   result = src;
ご覧のとおり、デフォルトの結果はsrcになります。
上記のブレンド係数のうち、2つは定数'constant'と'one-minus-constant'に言及しています。ここで参照されている定数は、setBlendConstantコマンドを使用してレンダーパスで設定され、デフォルトは[0, 0, 0, 0]です。これにより、描画間で変更できます。
おそらく、ブレンディングで最も一般的な設定は次のとおりです。
{
  operation: 'add',
  srcFactor: 'one',
  dstFactor: 'one-minus-src-alpha'
}
このモードは、「事前乗算されたアルファ」で最もよく使用されます。つまり、上記で説明したように、「src」のRGB色がすでにアルファ値で「事前乗算」されていることを期待します。
これらのオプションを示す例を作成しましょう。
まず、アルファを含む2つのキャンバス2D画像を作成するJavaScriptを作成しましょう。これらの2つのキャンバスをWebGPUテクスチャに読み込みます。
まず、dstテクスチャに使用する画像を作成するためのコードです。
const hsl = (h, s, l) => `hsl(${h * 360 | 0}, ${s * 100}%, ${l * 100 | 0}%)`;

function createDestinationImage(size) {
  const canvas = document.createElement('canvas');
  canvas.width = size;
  canvas.height = size;
  const ctx = canvas.getContext('2d');

  const gradient = ctx.createLinearGradient(0, 0, size, size);
  for (let i = 0; i <= 6; ++i) {
    gradient.addColorStop(i / 6, hsl(i / -6, 1, 0.5));
  }

  ctx.fillStyle = gradient;
  ctx.fillRect(0, 0, size, size);

  ctx.fillStyle = 'rgba(0, 0, 0, 255)';
  ctx.globalCompositeOperation = 'destination-out';
  ctx.rotate(Math.PI / -4);
  for (let i = 0; i < size * 2; i += 32) {
    ctx.fillRect(-size, i, size * 2, 16);
  }

  return canvas;
}
そして、実行中です。
これは、srcテクスチャに使用する画像を作成するためのコードです。
const hsla = (h, s, l, a) => `hsla(${h * 360 | 0}, ${s * 100}%, ${l * 100 | 0}%, ${a})`;

function createSourceImage(size) {
  const canvas = document.createElement('canvas');
  canvas.width = size;
  canvas.height = size;
  const ctx = canvas.getContext('2d');
  ctx.translate(size / 2, size / 2);

  ctx.globalCompositeOperation = 'screen';
  const numCircles = 3;
  for (let i = 0; i < numCircles; ++i) {
    ctx.rotate(Math.PI * 2 / numCircles);
    ctx.save();
    ctx.translate(size / 6, 0);
    ctx.beginPath();

    const radius = size / 3;
    ctx.arc(0, 0, radius, 0, Math.PI * 2);

    const gradient = ctx.createRadialGradient(0, 0, radius / 2, 0, 0, radius);
    const h = i / numCircles;
    gradient.addColorStop(0.5, hsla(h, 1, 0.5, 1));
    gradient.addColorStop(1, hsla(h, 1, 0.5, 0));

    ctx.fillStyle = gradient;
    ctx.fill();
    ctx.restore();
  }
  return canvas;
}
そして、実行中です。
両方ができたので、テクスチャのインポートに関する記事のキャンバスインポートの例を変更できます。
まず、2つのキャンバス画像を作成しましょう。
const size = 300;
const srcCanvas = createSourceImage(size);
const dstCanvas = createDestinationImage(size);
シェーダーを変更して、テクスチャ座標を50で乗算しないようにしましょう。遠くに長い平面を描画しようとはしないためです。
@vertex fn vs(
  @builtin(vertex_index) vertexIndex : u32
) -> OurVertexShaderOutput {
  let pos = array(
    // 1番目の三角形
    vec2f( 0.0,  0.0),  // 中央
    vec2f( 1.0,  0.0),  // 右、中央
    vec2f( 0.0,  1.0),  // 中央、上

    // 2番目の三角形
    vec2f( 0.0,  1.0),  // 中央、上
    vec2f( 1.0,  0.0),  // 右、中央
    vec2f( 1.0,  1.0),  // 右、上
  );

  var vsOutput: OurVertexShaderOutput;
  let xy = pos[vertexIndex];
  vsOutput.position = uni.matrix * vec4f(xy, 0.0, 1.0);
-  vsOutput.texcoord = xy * vec2f(1, 50);
+  vsOutput.texcoord = xy;
  return vsOutput;
}
createTextureFromSource関数を更新して、premultipliedAlpha: true/falseを渡せるようにし、copyExternalTextureToImageに渡すようにしましょう。
-  function copySourceToTexture(device, texture, source, {flipY} = {}) {
+  function copySourceToTexture(device, texture, source, {flipY, premultipliedAlpha} = {}) {
    device.queue.copyExternalImageToTexture(
      { source, flipY, },
-      { texture },
+      { texture, premultipliedAlpha },
      { width: source.width, height: source.height },
    );

    if (texture.mipLevelCount > 1) {
      generateMips(device, texture);
    }
  }
次に、それを使用して、事前乗算されたものと「事前乗算されていない」もの、または「事前乗算されていない」ものの2つのバージョンの各テクスチャを作成しましょう。
  const srcTextureUnpremultipliedAlpha =
      createTextureFromSource(
          device, srcCanvas,
          {mips: true});
  const dstTextureUnpremultipliedAlpha =
      createTextureFromSource(
          device, dstCanvas,
          {mips: true});

  const srcTexturePremultipliedAlpha =
      createTextureFromSource(
          device, srcCanvas,
          {mips: true, premultipliedAlpha: true});
  const dstTexturePremultipliedAlpha =
      createTextureFromSource(
          device, dstCanvas,
          {mips: true, premultipliedAlpha: true});
注:シェーダーで事前乗算するオプションを追加することもできますが、それはあまり一般的ではありません。むしろ、ニーズに基づいて、色を含むすべてのテクスチャが事前乗算されているか、事前乗算されていないかを決定する方が一般的です。したがって、異なるテクスチャに固執し、事前乗算されたものまたは事前乗算されていないものを選択するためのUIオプションを追加します。
2つの描画のそれぞれにユニフォームバッファが必要です。2つの異なる場所に描画したい場合や、テクスチャが2つの異なるサイズである場合に備えてです。
  function makeUniformBufferAndValues(device) {
    // float32インデックスでのさまざまなユニフォーム値へのオフセット
    const kMatrixOffset = 0;

    // ユニフォーム値用のバッファを作成します
    const uniformBufferSize =
      16 * 4; // 行列は16個の32ビット浮動小数点数(各4バイト)です
    const buffer = device.createBuffer({
      label: 'uniforms for quad',
      size: uniformBufferSize,
      usage: GPUBufferUsage.UNIFORM | GPUBufferUsage.COPY_DST,
    });

    // JavaScript側でユニフォームの値を保持するための型付き配列を作成します
    const values = new Float32Array(uniformBufferSize / 4);
    const matrix = values.subarray(kMatrixOffset, 16);
    return { buffer, values, matrix };
  }
  const srcUniform = makeUniformBufferAndValues(device);
  const dstUniform = makeUniformBufferAndValues(device);
サンプラーが必要であり、各テクスチャにバインドグループが必要です。これにより、問題が発生します。バインドグループにはバインドグループレイアウトが必要です。このサイトのほとんどの例では、somePipeline.getBindGroupLayout(groupNumber)を呼び出すことによって、パイプラインからレイアウトを取得します。ただし、この場合、選択したブレンド状態設定に基づいてパイプラインを作成するため、レンダリング時まで、バインドグループレイアウトを取得するためのパイプラインはありません。
レンダリング時にバインドグループを作成できます。または、独自のバインドグループレイアウトを作成し、パイプラインにそれを使用するように指示できます。これにより、初期化時にバインドグループを作成でき、同じバインドグループレイアウトを使用するどのパイプラインとも互換性があります。
bindGroupLayoutとpipelineLayoutの作成の詳細については、別の記事で説明します。今のところ、シェーダーモジュールに一致するそれらを作成するコードは次のとおりです。
  const bindGroupLayout = device.createBindGroupLayout({
    entries: [
      { binding: 0, visibility: GPUShaderStage.FRAGMENT, sampler: { }, },
      { binding: 1, visibility: GPUShaderStage.FRAGMENT, texture: { } },
      { binding: 2, visibility: GPUShaderStage.VERTEX, buffer: { } },
    ],
  });

  const pipelineLayout = device.createPipelineLayout({
    bindGroupLayouts: [
      bindGroupLayout,
    ],
  });
バインドグループレイアウトが作成されたので、それを使用してバインドグループを作成できます。
  const sampler = device.createSampler({
    magFilter: 'linear',
    minFilter: 'linear',
    mipmapFilter: 'linear',
  });


  const srcBindGroupUnpremultipliedAlpha = device.createBindGroup({
    layout: bindGroupLayout,
    entries: [
      { binding: 0, resource: sampler },
      { binding: 1, resource: srcTextureUnpremultipliedAlpha },
      { binding: 2, resource: { buffer: srcUniform.buffer }},
    ],
  });

  const dstBindGroupUnpremultipliedAlpha = device.createBindGroup({
    layout: bindGroupLayout,
    entries: [
      { binding: 0, resource: sampler },
      { binding: 1, resource: dstTextureUnpremultipliedAlpha },
      { binding: 2, resource: { buffer: dstUniform.buffer }},
    ],
  });

  const srcBindGroupPremultipliedAlpha = device.createBindGroup({
    layout: bindGroupLayout,
    entries: [
      { binding: 0, resource: sampler },
      { binding: 1, resource: srcTexturePremultipliedAlpha },
      { binding: 2, resource: { buffer: srcUniform.buffer }},
    ],
  });

  const dstBindGroupPremultipliedAlpha = device.createBindGroup({
    layout: bindGroupLayout,
    entries: [
      { binding: 0, resource: sampler },
      { binding: 1, resource: dstTexturePremultipliedAlpha },
      { binding: 2, resource: { buffer: dstUniform.buffer }},
    ],
  });
バインドグループとテクスチャができたので、事前乗算されたテクスチャと事前乗算されていないテクスチャの配列を作成して、一方のセットまたは他方のセットを簡単に選択できるようにしましょう。
  const textureSets = [
    {
      srcTexture: srcTexturePremultipliedAlpha,
      dstTexture: dstTexturePremultipliedAlpha,
      srcBindGroup: srcBindGroupPremultipliedAlpha,
      dstBindGroup: dstBindGroupPremultipliedAlpha,
    },
    {
      srcTexture: srcTextureUnpremultipliedAlpha,
      dstTexture: dstTextureUnpremultipliedAlpha,
      srcBindGroup: srcBindGroupUnpremultipliedAlpha,
      dstBindGroup: dstBindGroupUnpremultipliedAlpha,
    },
  ];
レンダーパス記述子で、clearValueを抽出して、より簡単にアクセスできるようにします。
+  const clearValue = [0, 0, 0, 0];
  const renderPassDescriptor = {
    label: 'our basic canvas renderPass',
    colorAttachments: [
      {
        // view: <- レンダリング時に設定されます
-        clearValue: [0.3, 0.3, 0.3, 1];
+        clearValue,
        loadOp: 'clear',
        storeOp: 'store',
      },
    ],
  };
2つのレンダーパイプラインが必要です。1つは宛先テクスチャを描画するためのもので、これはブレンディングを使用しません。これまでのほとんどの例で行ってきたように、autoを使用する代わりにパイプラインレイアウトを渡していることに注意してください。
  const dstPipeline = device.createRenderPipeline({
    label: 'hardcoded textured quad pipeline',
    layout: pipelineLayout,
    vertex: {
      module,
    },
    fragment: {
      module,
      targets: [ { format: presentationFormat } ],
    },
  });
もう1つのパイプラインは、選択したブレンドオプションでレンダリング時に作成されます。
  const color = {
    operation: 'add',
    srcFactor: 'one',
    dstFactor: 'one-minus-src',
  };

  const alpha = {
    operation: 'add',
    srcFactor: 'one',
    dstFactor: 'one-minus-src',
  };

  function render() {
    ...

    const srcPipeline = device.createRenderPipeline({
      label: 'hardcoded textured quad pipeline',
      layout: pipelineLayout,
      vertex: {
        module,
      },
      fragment: {
        module,
        targets: [
          {
            format: presentationFormat,
            blend: {
              color,
              alpha,
            },
          },
        ],
      },
    });
レンダリングするには、テクスチャセットを選択し、dstPipeline(ブレンディングなし)でdstテクスチャをレンダリングし、その上にsrcPipeline(ブレンディングあり)でsrcテクスチャをレンダリングします。
+  const settings = {
+    textureSet: 0,
+  };

  function render() {
    const srcPipeline = device.createRenderPipeline({
      label: 'hardcoded textured quad pipeline',
      layout: pipelineLayout,
      vertex: {
        module,
      },
      fragment: {
        module,
        targets: [
          {
            format: presentationFormat,
            blend: {
              color,
              alpha,
            },
          },
        ],
      },
    });

+    const {
+      srcTexture,
+      dstTexture,
+      srcBindGroup,
+      dstBindGroup,
+    } = textureSets[settings.textureSet];

    const canvasTexture = context.getCurrentTexture();
    // キャンバスコンテキストから現在のテクスチャを取得し、
    // レンダリングするテクスチャとして設定します。
    renderPassDescriptor.colorAttachments[0].view =
        canvasTexture.createView();

+    function updateUniforms(uniform, canvasTexture, texture) {
+      const projectionMatrix = mat4.ortho(0, canvasTexture.width, canvasTexture.height, 0, -1, 1);
+
+      mat4.scale(projectionMatrix, [texture.width, texture.height, 1], uniform.matrix);
+
+      // JavaScriptからGPUに値をコピーします
+      device.queue.writeBuffer(uniform.buffer, 0, uniform.values);
+    }
+    updateUniforms(srcUniform, canvasTexture, srcTexture);
+    updateUniforms(dstUniform, canvasTexture, dstTexture);

    const encoder = device.createCommandEncoder({ label: 'render with blending' });
    const pass = encoder.beginRenderPass(renderPassDescriptor);

+    // dstを描画します
+    pass.setPipeline(dstPipeline);
+    pass.setBindGroup(0, dstBindGroup);
+    pass.draw(6);  // 頂点シェーダーを6回呼び出します
+
+    // srcを描画します
+    pass.setPipeline(srcPipeline);
+    pass.setBindGroup(0, srcBindGroup);
+    pass.draw(6);  // 頂点シェーダーを6回呼び出します

    pass.end();

    const commandBuffer = encoder.finish();
    device.queue.submit([commandBuffer]);
  }
次に、これらの値を設定するためのUIを作成しましょう。
+  const presets = {
+    'default (copy)': {
+      color: {
+        operation: 'add',
+        srcFactor: 'one',
+        dstFactor: 'zero',
+      },
+    },
+    'premultiplied blend (source-over)': {
+      color: {
+        operation: 'add',
+        srcFactor: 'one',
+        dstFactor: 'one-minus-src-alpha',
+      },
+    },
+    'un-premultiplied blend': {
+      color: {
+        operation: 'add',
+        srcFactor: 'src-alpha',
+        dstFactor: 'one-minus-src-alpha',
+      },
+    },
+    'destination-over': {
+      color: {
+        operation: 'add',
+        srcFactor: 'one-minus-dst-alpha',
+        dstFactor: 'one',
+      },
+    },
+    'source-in': {
+      color: {
+        operation: 'add',
+        srcFactor: 'dst-alpha',
+        dstFactor: 'zero',
+      },
+    },
+    'destination-in': {
+      color: {
+        operation: 'add',
+        srcFactor: 'zero',
+        dstFactor: 'src-alpha',
+      },
+    },
+    'source-out': {
+      color: {
+        operation: 'add',
+        srcFactor: 'one-minus-dst-alpha',
+        dstFactor: 'zero',
+      },
+    },
+    'destination-out': {
+      color: {
+        operation: 'add',
+        srcFactor: 'zero',
+        dstFactor: 'one-minus-src-alpha',
+      },
+    },
+    'source-atop': {
+      color: {
+        operation: 'add',
+        srcFactor: 'dst-alpha',
+        dstFactor: 'one-minus-src-alpha',
+      },
+    },
+    'destination-atop': {
+      color: {
+        operation: 'add',
+        srcFactor: 'one-minus-dst-alpha',
+        dstFactor: 'src-alpha',
+      },
+    },
+    'additive (lighten)': {
+      color: {
+        operation: 'add',
+        srcFactor: 'one',
+        dstFactor: 'one',
+      },
+    },
+  };

  ...

  const settings = {
    textureSet: 0,
+    preset: 'default (copy)',
  };

  const gui = new GUI().onChange(render);
  gui.add(settings, 'textureSet', ['premultiplied alpha', 'un-premultiplied alpha']);
+  gui.add(settings, 'preset', Object.keys(presets))
+    .name('blending preset')
+    .onChange(presetName => {
+      const preset = presets[presetName];
+      Object.assign(color, preset.color);
+      Object.assign(alpha, preset.alpha || preset.color);
+      gui.updateDisplay();
+    });

  ...
operationが'min'または'max'の場合、srcFactorとdstFactorを'one'に設定しないと、エラーが発生します。
+  function makeBlendComponentValid(blend) {
+    const { operation } = blend;
+    if (operation === 'min' || operation === 'max') {
+      blend.srcFactor = 'one';
+      blend.dstFactor = 'one';
+    }
+  }

  function render() {
+    makeBlendComponentValid(color);
+    makeBlendComponentValid(alpha);
+    gui.updateDisplay();

    ...
また、'constant'または'one-minus-constant'を係数として選択した場合に、ブレンド定数を設定できるようにしましょう。
+  const constant = {
+    color: [1, 0.5, 0.25],
+    alpha: 1,
+  };

  const settings = {
    textureSet: 0,
  };

  const gui = new GUI().onChange(render);
  gui.add(settings, 'textureSet', ['premultiplied alpha', 'un-premultiplied alpha']);
  ...
+  const constantFolder = gui.addFolder('constant');
+  constantFolder.addColor(constant, 'color');
+  constantFolder.add(constant, 'alpha', 0, 1);

  ...

  function render() {
    ...

    const pass = encoder.beginRenderPass(renderPassDescriptor);

    // dstを描画します
    pass.setPipeline(dstPipeline);
    pass.setBindGroup(0, dstBindGroup);
    pass.draw(6);  // 頂点シェーダーを6回呼び出します

    // srcを描画します
    pass.setPipeline(srcPipeline);
    pass.setBindGroup(0, srcBindGroup);
+    pass.setBlendConstant([...constant.color, constant.alpha]);
    pass.draw(6);  // 頂点シェーダーを6回呼び出します

    pass.end();
  }
13 * 13 * 5 * 13 * 13 * 5通りの設定があるため、探索するには多すぎるので、プリセットのリストを提供しましょう。alpha設定がない場合は、color設定を繰り返します。
+  const presets = {
+    'default (copy)': {
+      color: {
+        operation: 'add',
+        srcFactor: 'one',
+        dstFactor: 'zero',
+      },
+    },
+    'premultiplied blend (source-over)': {
+      color: {
+        operation: 'add',
+        srcFactor: 'one',
+        dstFactor: 'one-minus-src-alpha',
+      },
+    },
+    'un-premultiplied blend': {
+      color: {
+        operation: 'add',
+        srcFactor: 'src-alpha',
+        dstFactor: 'one-minus-src-alpha',
+      },
+    },
+    'destination-over': {
+      color: {
+        operation: 'add',
+        srcFactor: 'one-minus-dst-alpha',
+        dstFactor: 'one',
+      },
+    },
+    'source-in': {
+      color: {
+        operation: 'add',
+        srcFactor: 'dst-alpha',
+        dstFactor: 'zero',
+      },
+    },
+    'destination-in': {
+      color: {
+        operation: 'add',
+        srcFactor: 'zero',
+        dstFactor: 'src-alpha',
+      },
+    },
+    'source-out': {
+      color: {
+        operation: 'add',
+        srcFactor: 'one-minus-dst-alpha',
+        dstFactor: 'zero',
+      },
+    },
+    'destination-out': {
+      color: {
+        operation: 'add',
+        srcFactor: 'zero',
+        dstFactor: 'one-minus-src-alpha',
+      },
+    },
+    'source-atop': {
+      color: {
+        operation: 'add',
+        srcFactor: 'dst-alpha',
+        dstFactor: 'one-minus-src-alpha',
+      },
+    },
+    'destination-atop': {
+      color: {
+        operation: 'add',
+        srcFactor: 'one-minus-dst-alpha',
+        dstFactor: 'src-alpha',
+      },
+    },
+    'additive (lighten)': {
+      color: {
+        operation: 'add',
+        srcFactor: 'one',
+        dstFactor: 'one',
+      },
+    },
+  };

  ...

  const settings = {
    textureSet: 0,
+    preset: 'default (copy)',
  };

  const gui = new GUI().onChange(render);
  gui.add(settings, 'textureSet', ['premultiplied alpha', 'un-premultiplied alpha']);
+  gui.add(settings, 'preset', Object.keys(presets))
+    .name('blending preset')
+    .onChange(presetName => {
+      const preset = presets[presetName];
+      Object.assign(color, preset.color);
+      Object.assign(alpha, preset.alpha || preset.color);
+      gui.updateDisplay();
+    });

  ...
また、alphaModeのキャンバス構成を選択できるようにしましょう。
  const settings = {
+    alphaMode: 'premultiplied',
    textureSet: 0,
    preset: 'default (copy)',
  };

  const gui = new GUI().onChange(render);
+  gui.add(settings, 'alphaMode', ['opaque', 'premultiplied']).name('canvas alphaMode');
  gui.add(settings, 'textureSet', ['premultiplied alpha', 'un-premultiplied alpha']);

  ...

  function render() {
    ...

+    context.configure({
+      device,
+      format: presentationFormat,
+      alphaMode: settings.alphaMode,
+    });

    const canvasTexture = context.getCurrentTexture();
    // キャンバスコンテキストから現在のテクスチャを取得し、
    // レンダリングするテクスチャとして設定します。
    renderPassDescriptor.colorAttachments[0].view =
        canvasTexture.createView();
そして最後に、レンダーパスのクリア値を選択できるようにしましょう。
+  const clear = {
+    color: [0, 0, 0],
+    alpha: 0,
+    premultiply: true,
+  };

  const settings = {
    alphaMode: 'premultiplied',
    textureSet: 0,
    preset: 'default (copy)',
  };

  const gui = new GUI().onChange(render);

  ...

+  const clearFolder = gui.addFolder('clear color');
+  clearFolder.add(clear, 'premultiply');
+  clearFolder.add(clear, 'alpha', 0, 1);
+  clearFolder.addColor(clear, 'color');

  function render() {
    ...

    const canvasTexture = context.getCurrentTexture();
    // キャンバスコンテキストから現在のテクスチャを取得し、
    // レンダリングするテクスチャとして設定します。
    renderPassDescriptor.colorAttachments[0].view =
        canvasTexture.createView();

+    {
+      const { alpha, color, premultiply } = clear;
+      const mult = premultiply ? alpha : 1;
+      clearValue[0] = color[0] * mult;
+      clearValue[1] = color[1] * mult;
+      clearValue[2] = color[2] * mult;
+      clearValue[3] = alpha;
+    }
たくさんのオプションがありました。多すぎたかもしれません😅。いずれにせよ、これでブレンド設定を試すことができる例ができました。
元の画像が与えられた場合
既知の便利なブレンド設定をいくつか紹介します。
これらのブレンド設定名は、Canvas 2DのglobalCompositeOperationオプションからのものです。その仕様にはさらに多くのオプションがリストされていますが、残りのほとんどは、これらの基本的なブレンディング設定のみで実行できるよりも多くの数学を必要とするため、異なる解決策が必要です。
WebGPUでのブレンディングのこれらの基本を理解したので、さまざまなテクニックを説明するときにそれらを参照できます。